Employee
The date ranges never include the last day, so if you choose this date range:
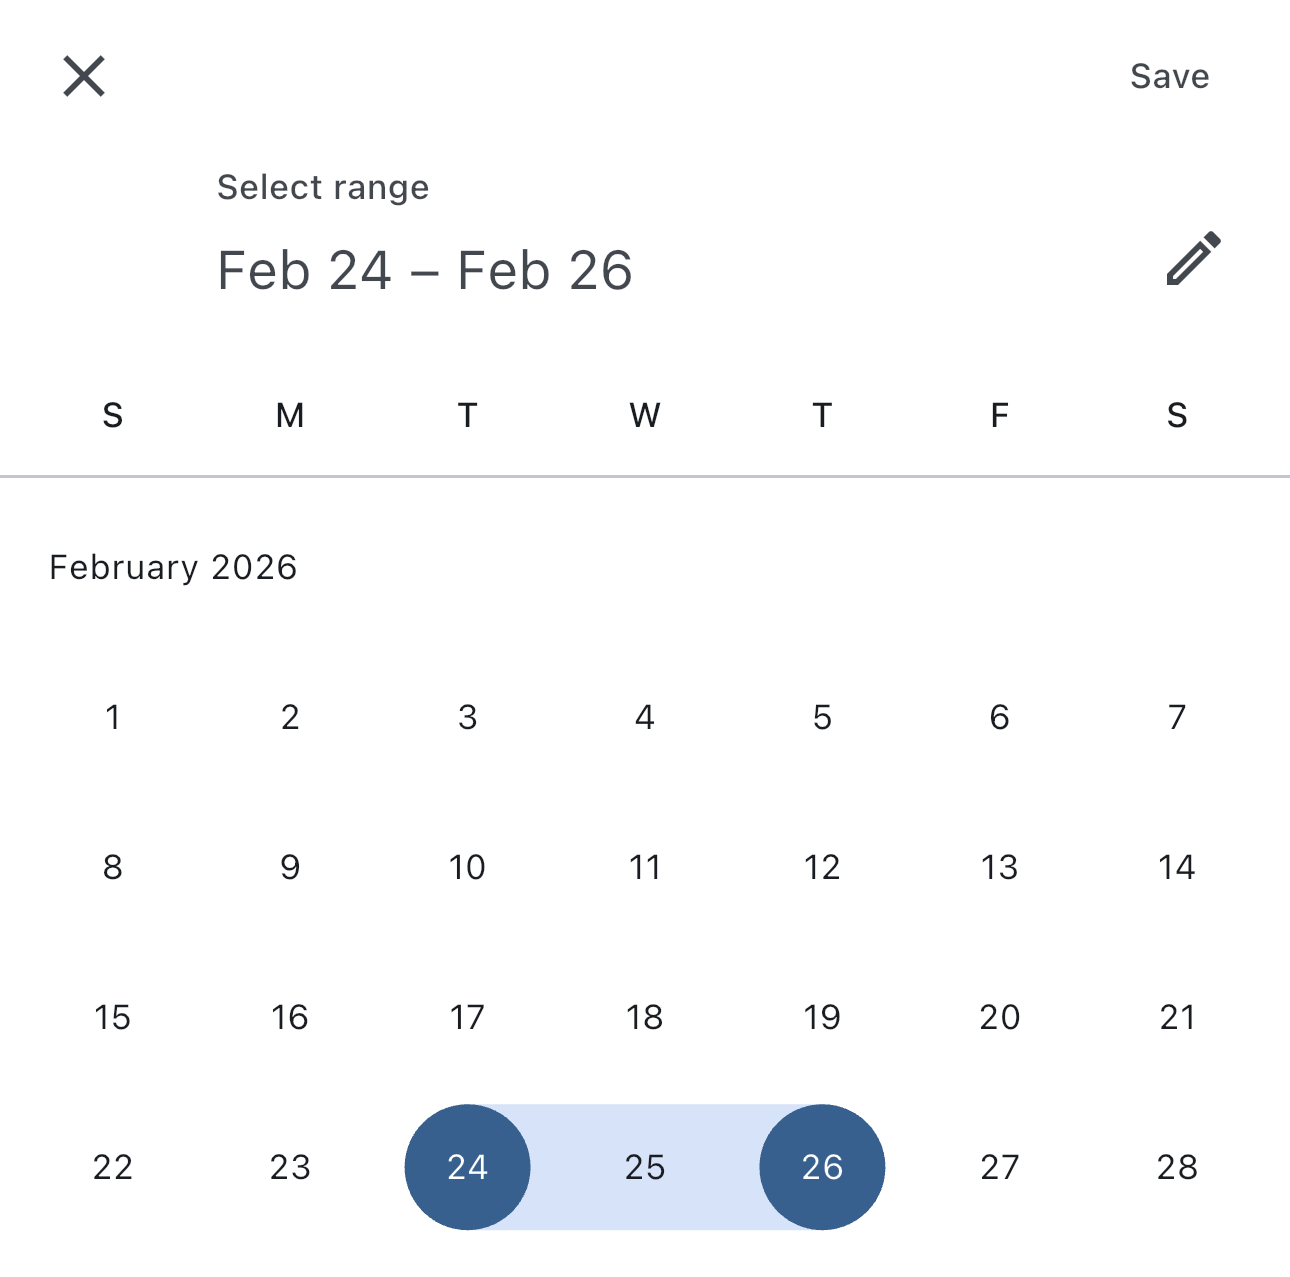
you'll choose a range from February 24th to February 25th.
Shifts view
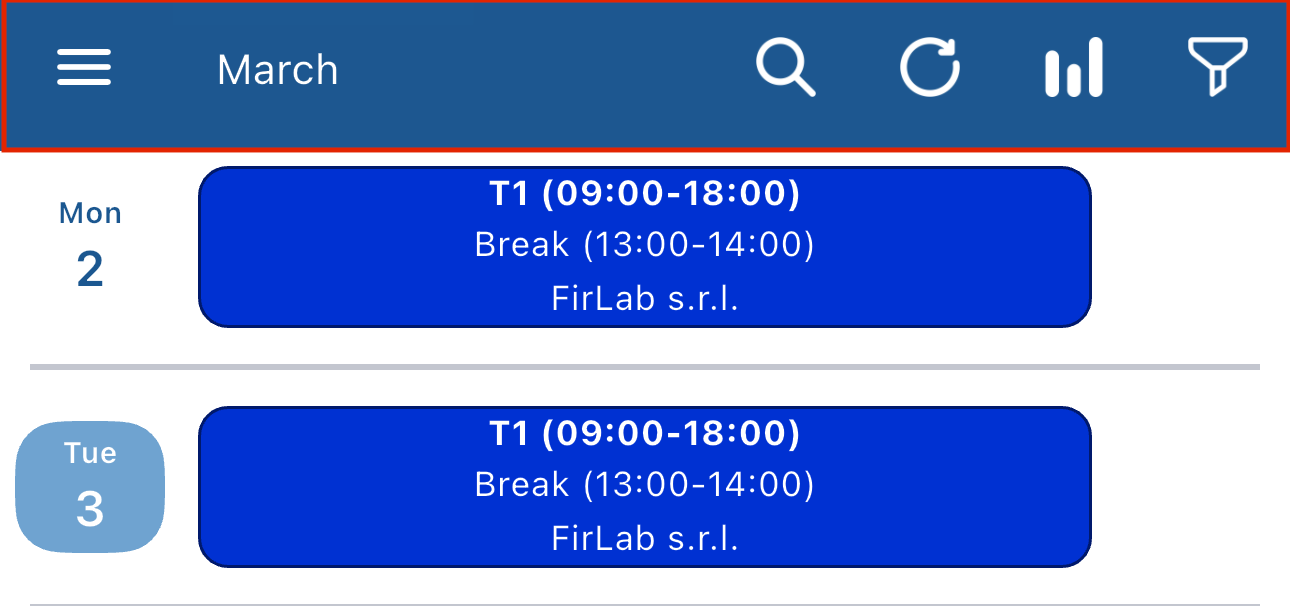
When you open the app or log in you are in the shifts view. This is the main view of the app:
This is a day by day list of your shifts, your absences, your overtimes, your statistics(e.g. work from home, business trip) and your preferences(I prefer to work, I prefer not to work, I'd like to swap my shift with a colleague)
Elements in the shifts view
Shifts
Shifts are of course the main element, the only element which is present in every day of the list, and depending on your company they could have just the time:

the time and the name of the shift:

or they could be leave shifts(L).
These are placed on the days on which you don't work:

Clockings
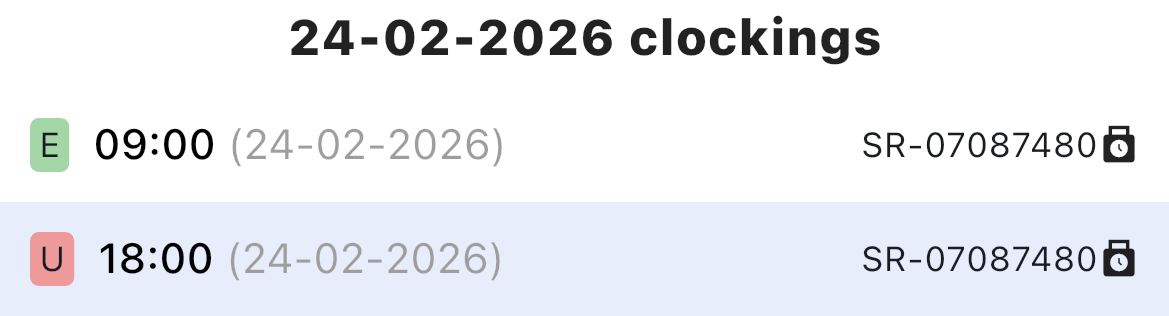
If your company allows it, you can see your clockings next to each shift. They are green when you clock in and red when you clock out and they are to the right of the shift.
These are clockings next to a shift:

If you tap on the clock icon you can see more details about the clockings:
Absences
You must request absences when you work for less time then you should, or don't work at all for one or more days.
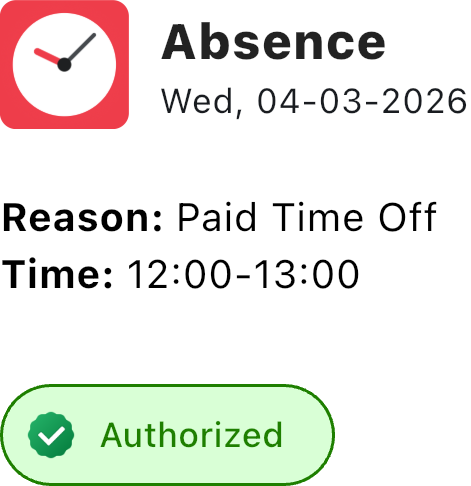
Absences have a red clock icon, and by tapping on an absence you can see the details and the status, which tells you if the absence has been authorized, rejected, or if it's pending, which means that it hasn't been authorized or rejected yet.
This is an absence:

This is the view that appears when you tap on it. In the lower part you can see the status, which is authorized:
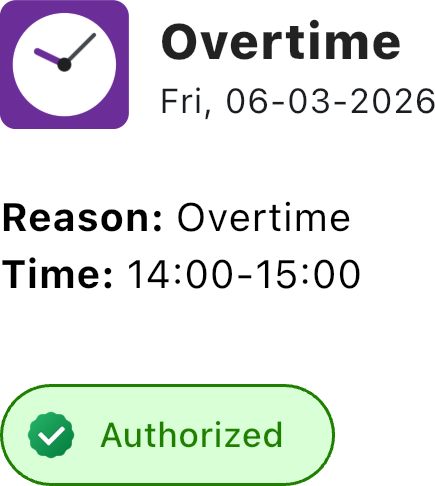
Overtime
You can request overtime if you want to work more hours than you're expected to. Overtime has a purple clock icon and like absences, they need approval from your manager, so they have the same three statuses as absences: authorized, rejected or pending.
This is an overtime:

This is the view that appears when you tap on it. In the lower part you can see the status, which is authorized:
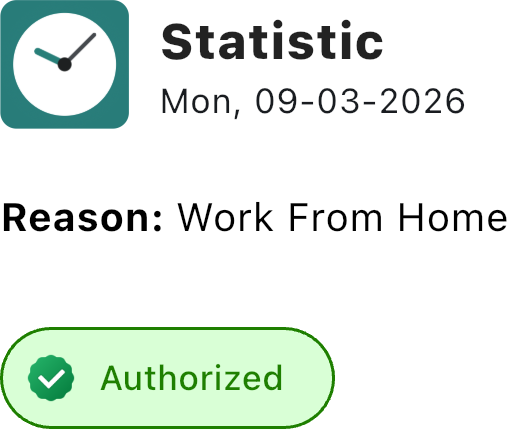
Statistics
Statistics are elements that can be added to a shift to add more details about your work, for example if you're working from home, or if you're away from the office for a business trip. They have a teal colored clock icon and they also have three states as the elements we've seen before: authorized, rejected or pending.
This is a statistic:

This is the view that appears when you tap on it. In the lower part you can see the status, which is authorized:
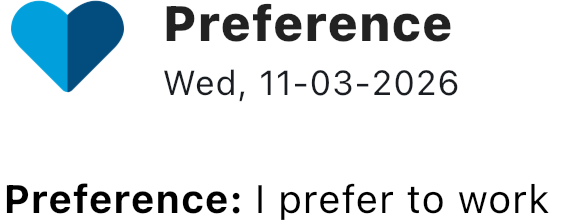
Preferences and shift swaps
If your company allows it, you can add a preference regarding your shifts that will be visible to your manager. For example, you could say that you prefer not to work for a day, and work another, or you could ask for the manager to swap your shift with the one from a different day.
This is a preference:

This is the view that appears when you tap on it:
Shift preview
Your manager can show you a week of shifts that haven't been published yet to let you plan ahead.
The shift preview shifts look like this, and are subject to change:

Interacting with elements in the shifts view
If your company allows it, you can delete element from your shifts view, except for the shift itself.
To delete an element, swipe left on it and a trash can icon will appear:

Tapping the trash can icon will make a confirmation dialog pop up:
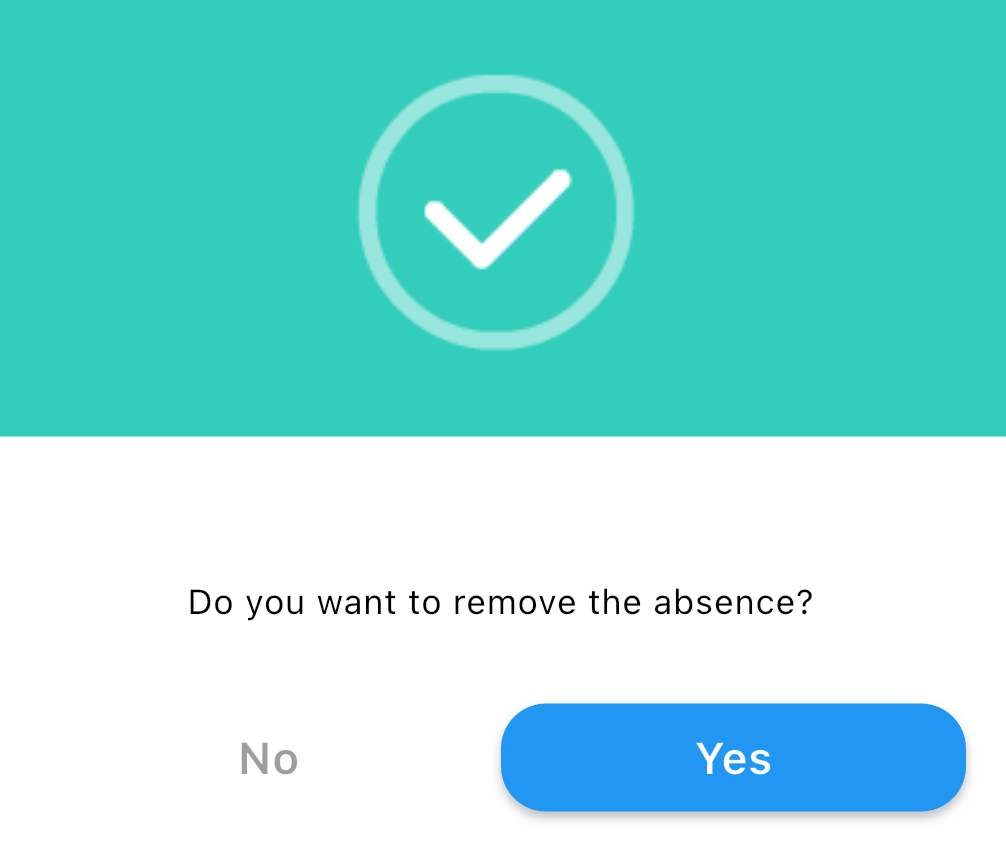
If you tap "Yes", the element will be deleted.
Adding elements to the shifts view
The  button in the lower right corner of the shifts view allows you to add clockings and elements to the view.
These are all the elements that you can add:
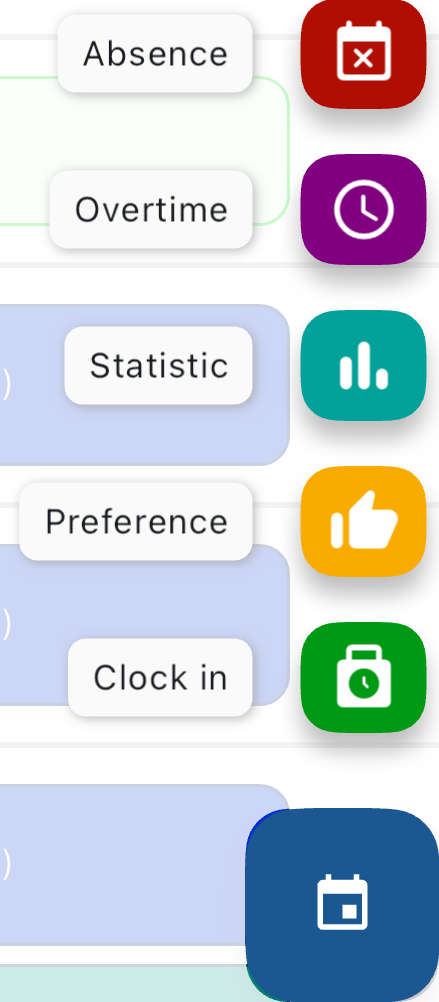
Depending on your company's policies, you may not see some options.
Adding a clocking
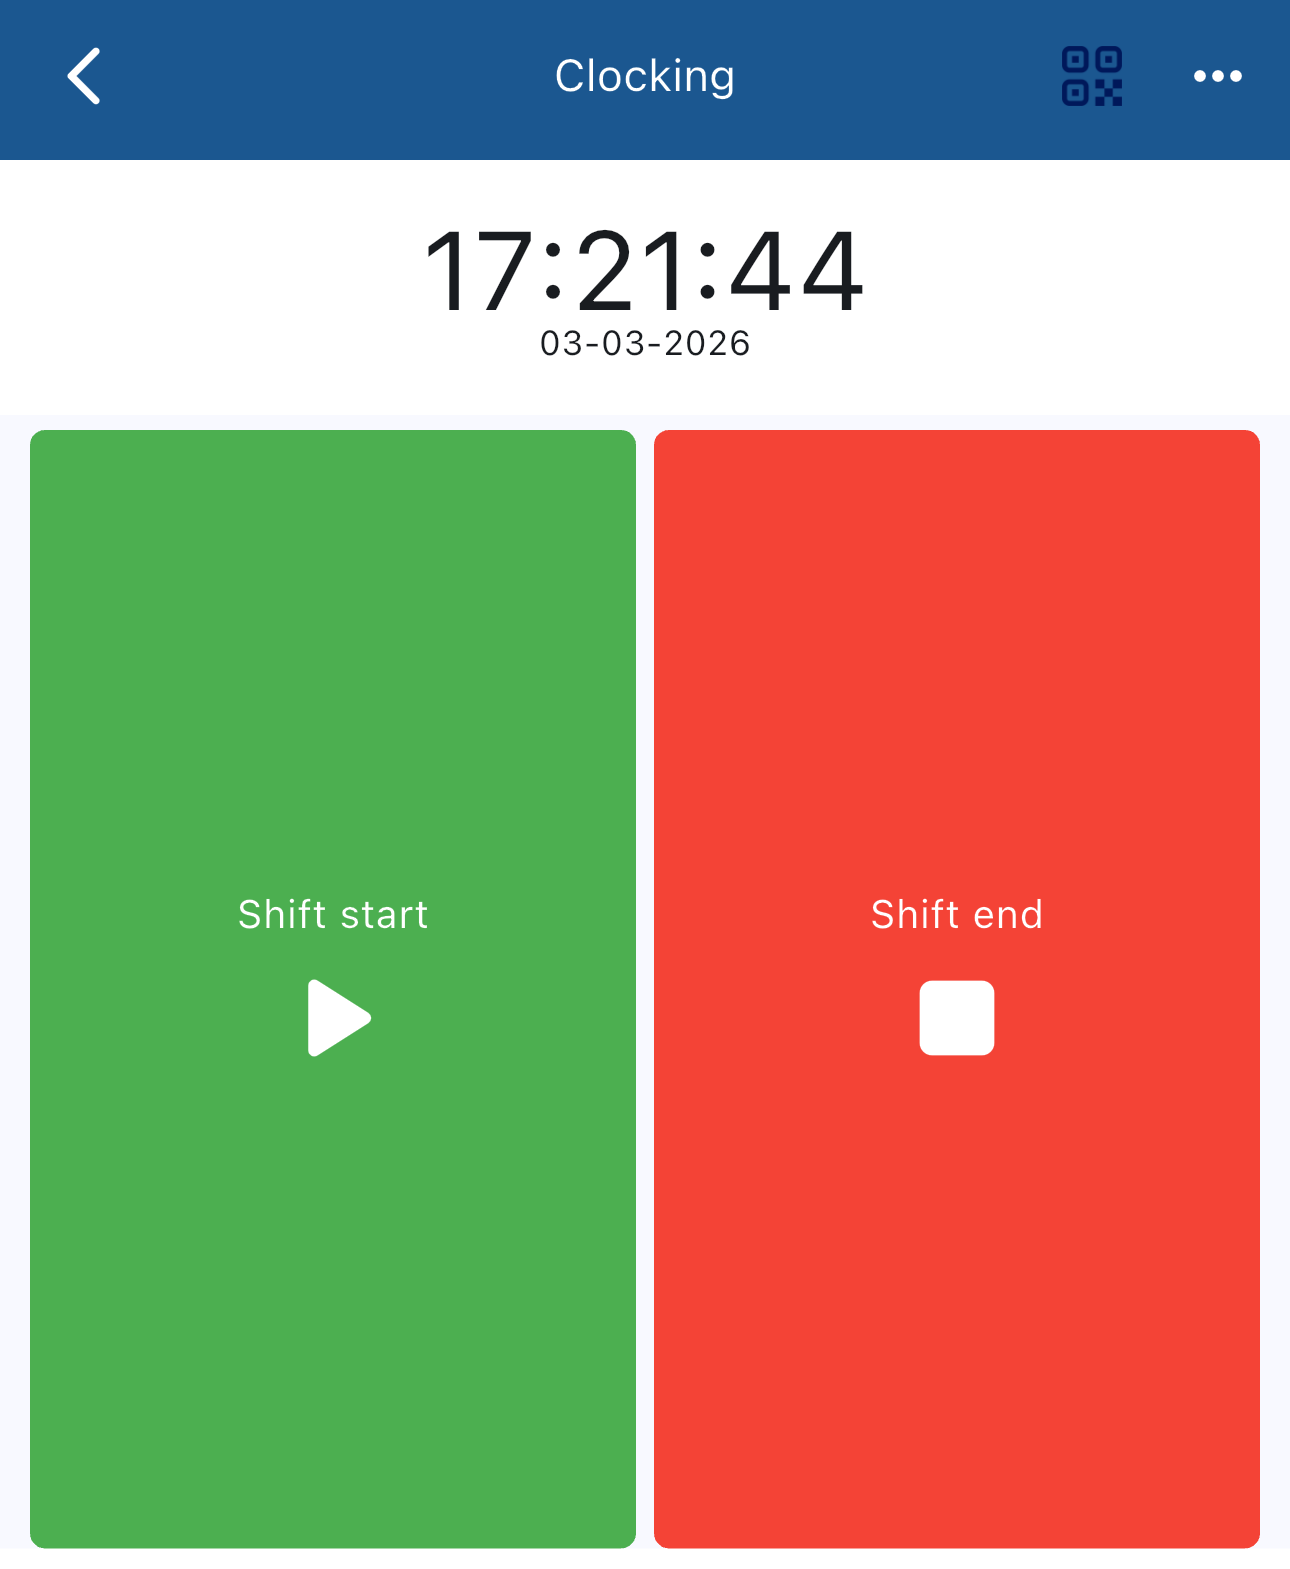
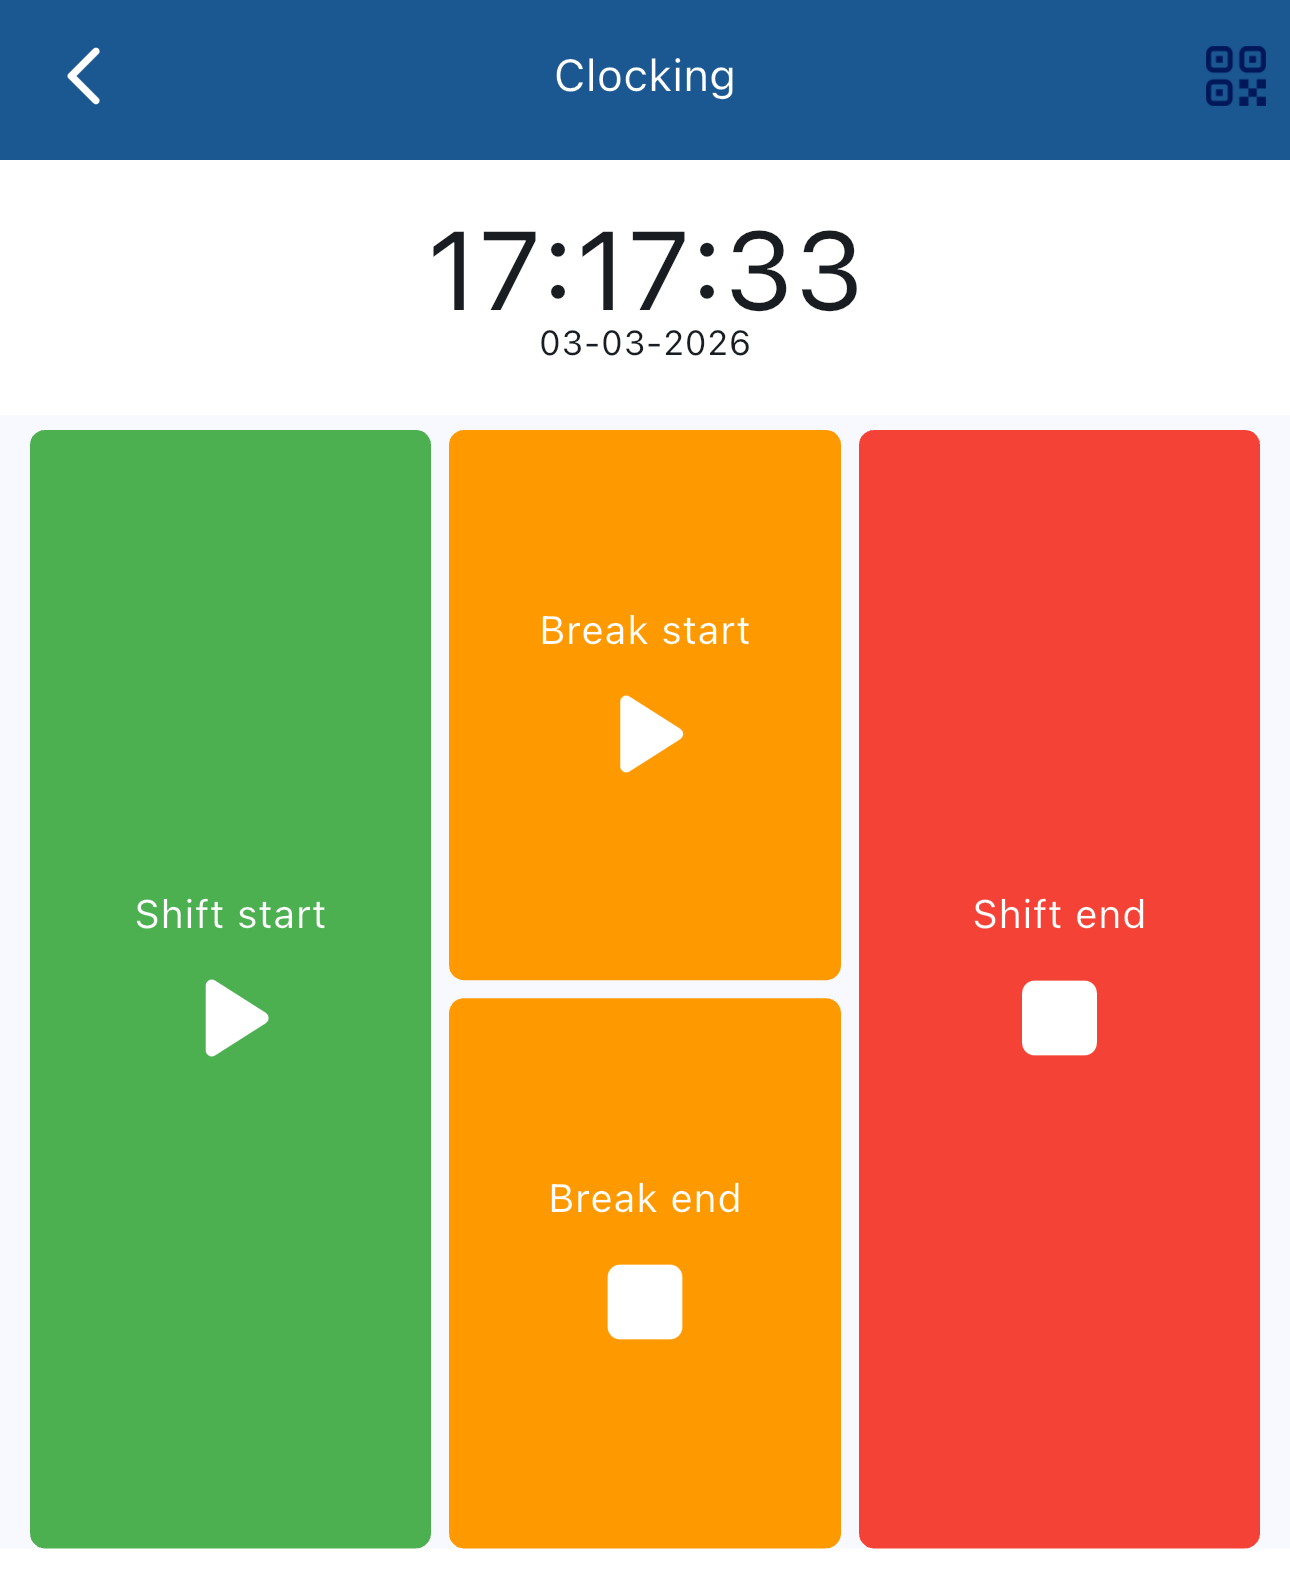
By tapping on the Clock in  button, you can add a clocking for starting or ending a shift, and if your company requires it you may also need to clock in and out for breaks.
You'll see this view if your company doesn't require break clockings:
You'll see this view if your company requires break clockings:
If you forget to clock in or out, some companies allow you to request a clocking in the past. If your company allows it, you'll see this button  in the lower part of the clocking view.
By tapping it you can set the time and date of the clocking, the terminal that you should have used, the action(shift/break start/end) and you can add a note for your manager:
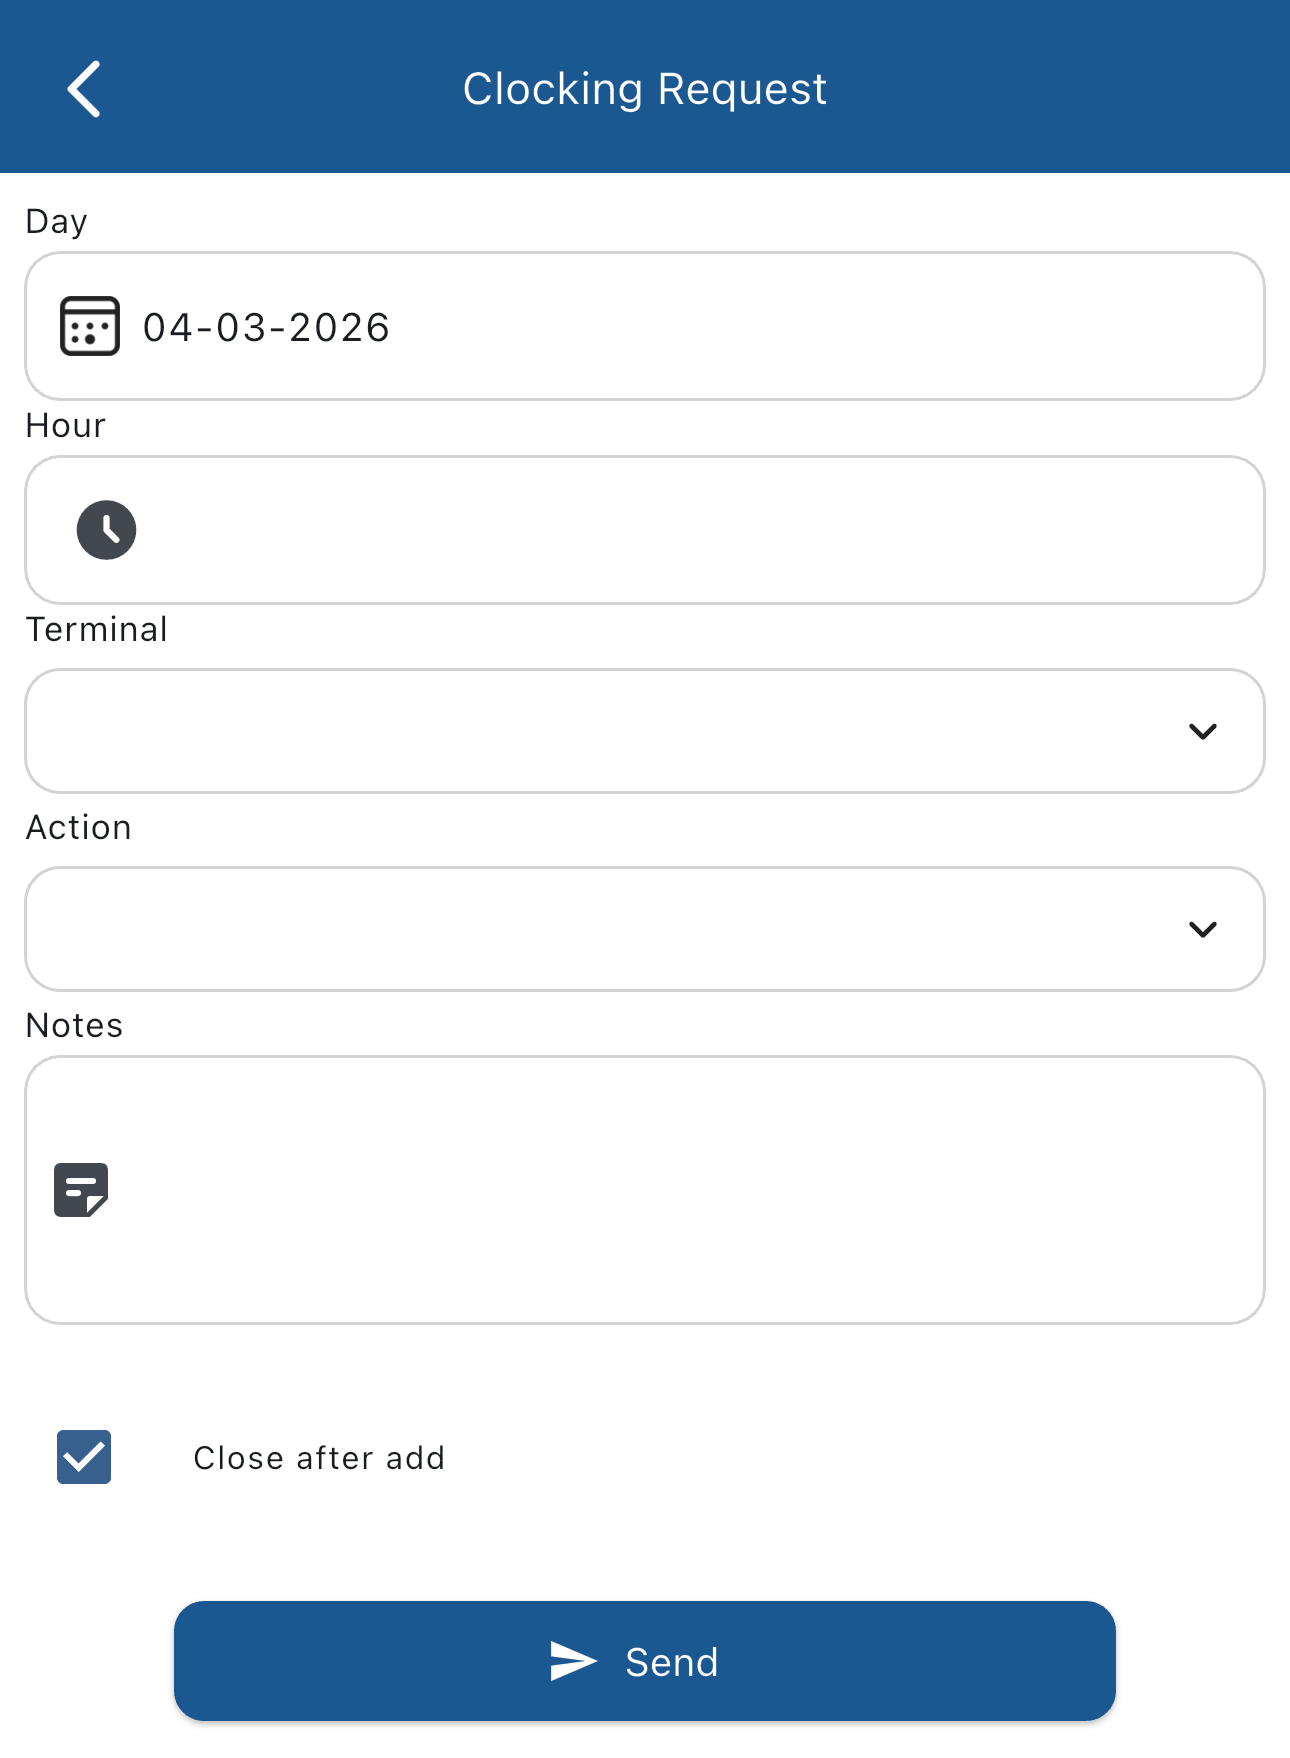
Clocking requests may require approval by your manager.
If your company doesn't allow clockings the Clock in button is replaced by the Clocking request  button, and by tapping it you'll see the request clocking view that we've seen previously.
Adding a preference or shift swap request
By tapping on the Preference  button, you can add a preference or a shift swap.
This is the preference view:
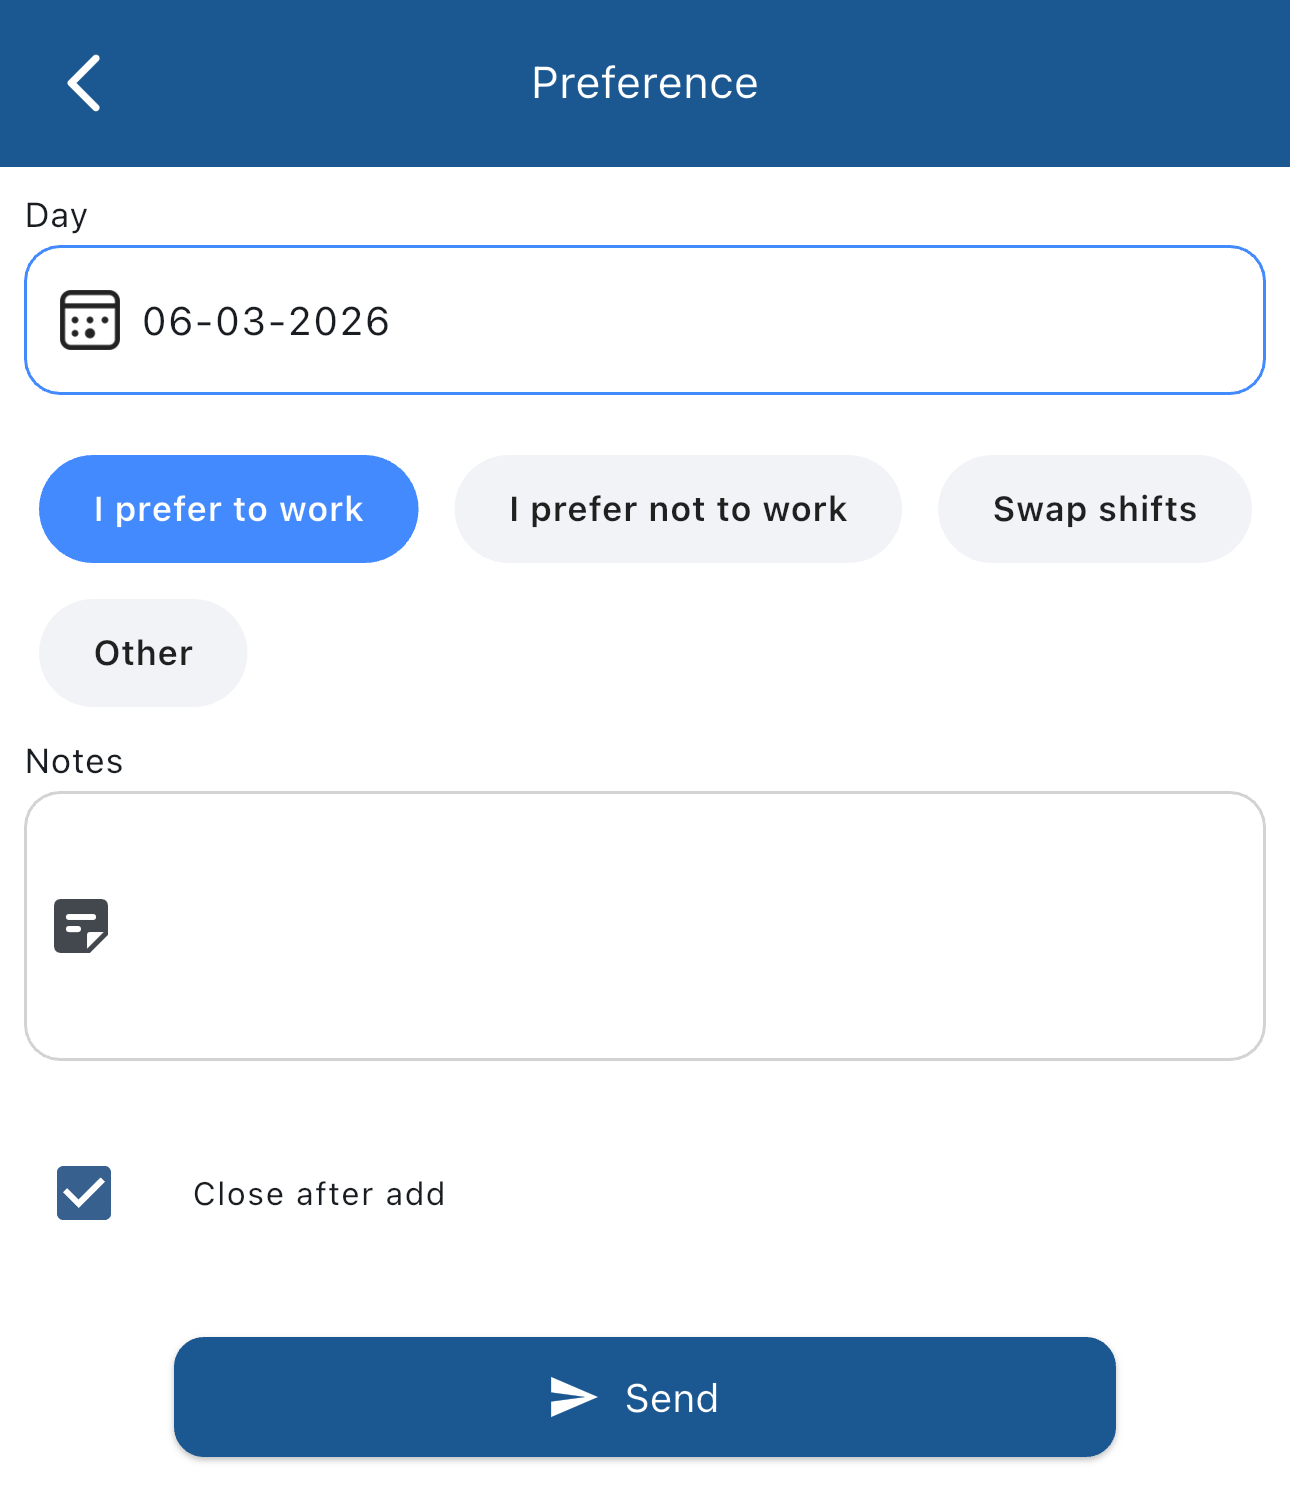
To add a preference, just set the day and the preference(I prefer to work or I prefer not to work)
If you want to swap shifts instead, tap on Swap shifts:
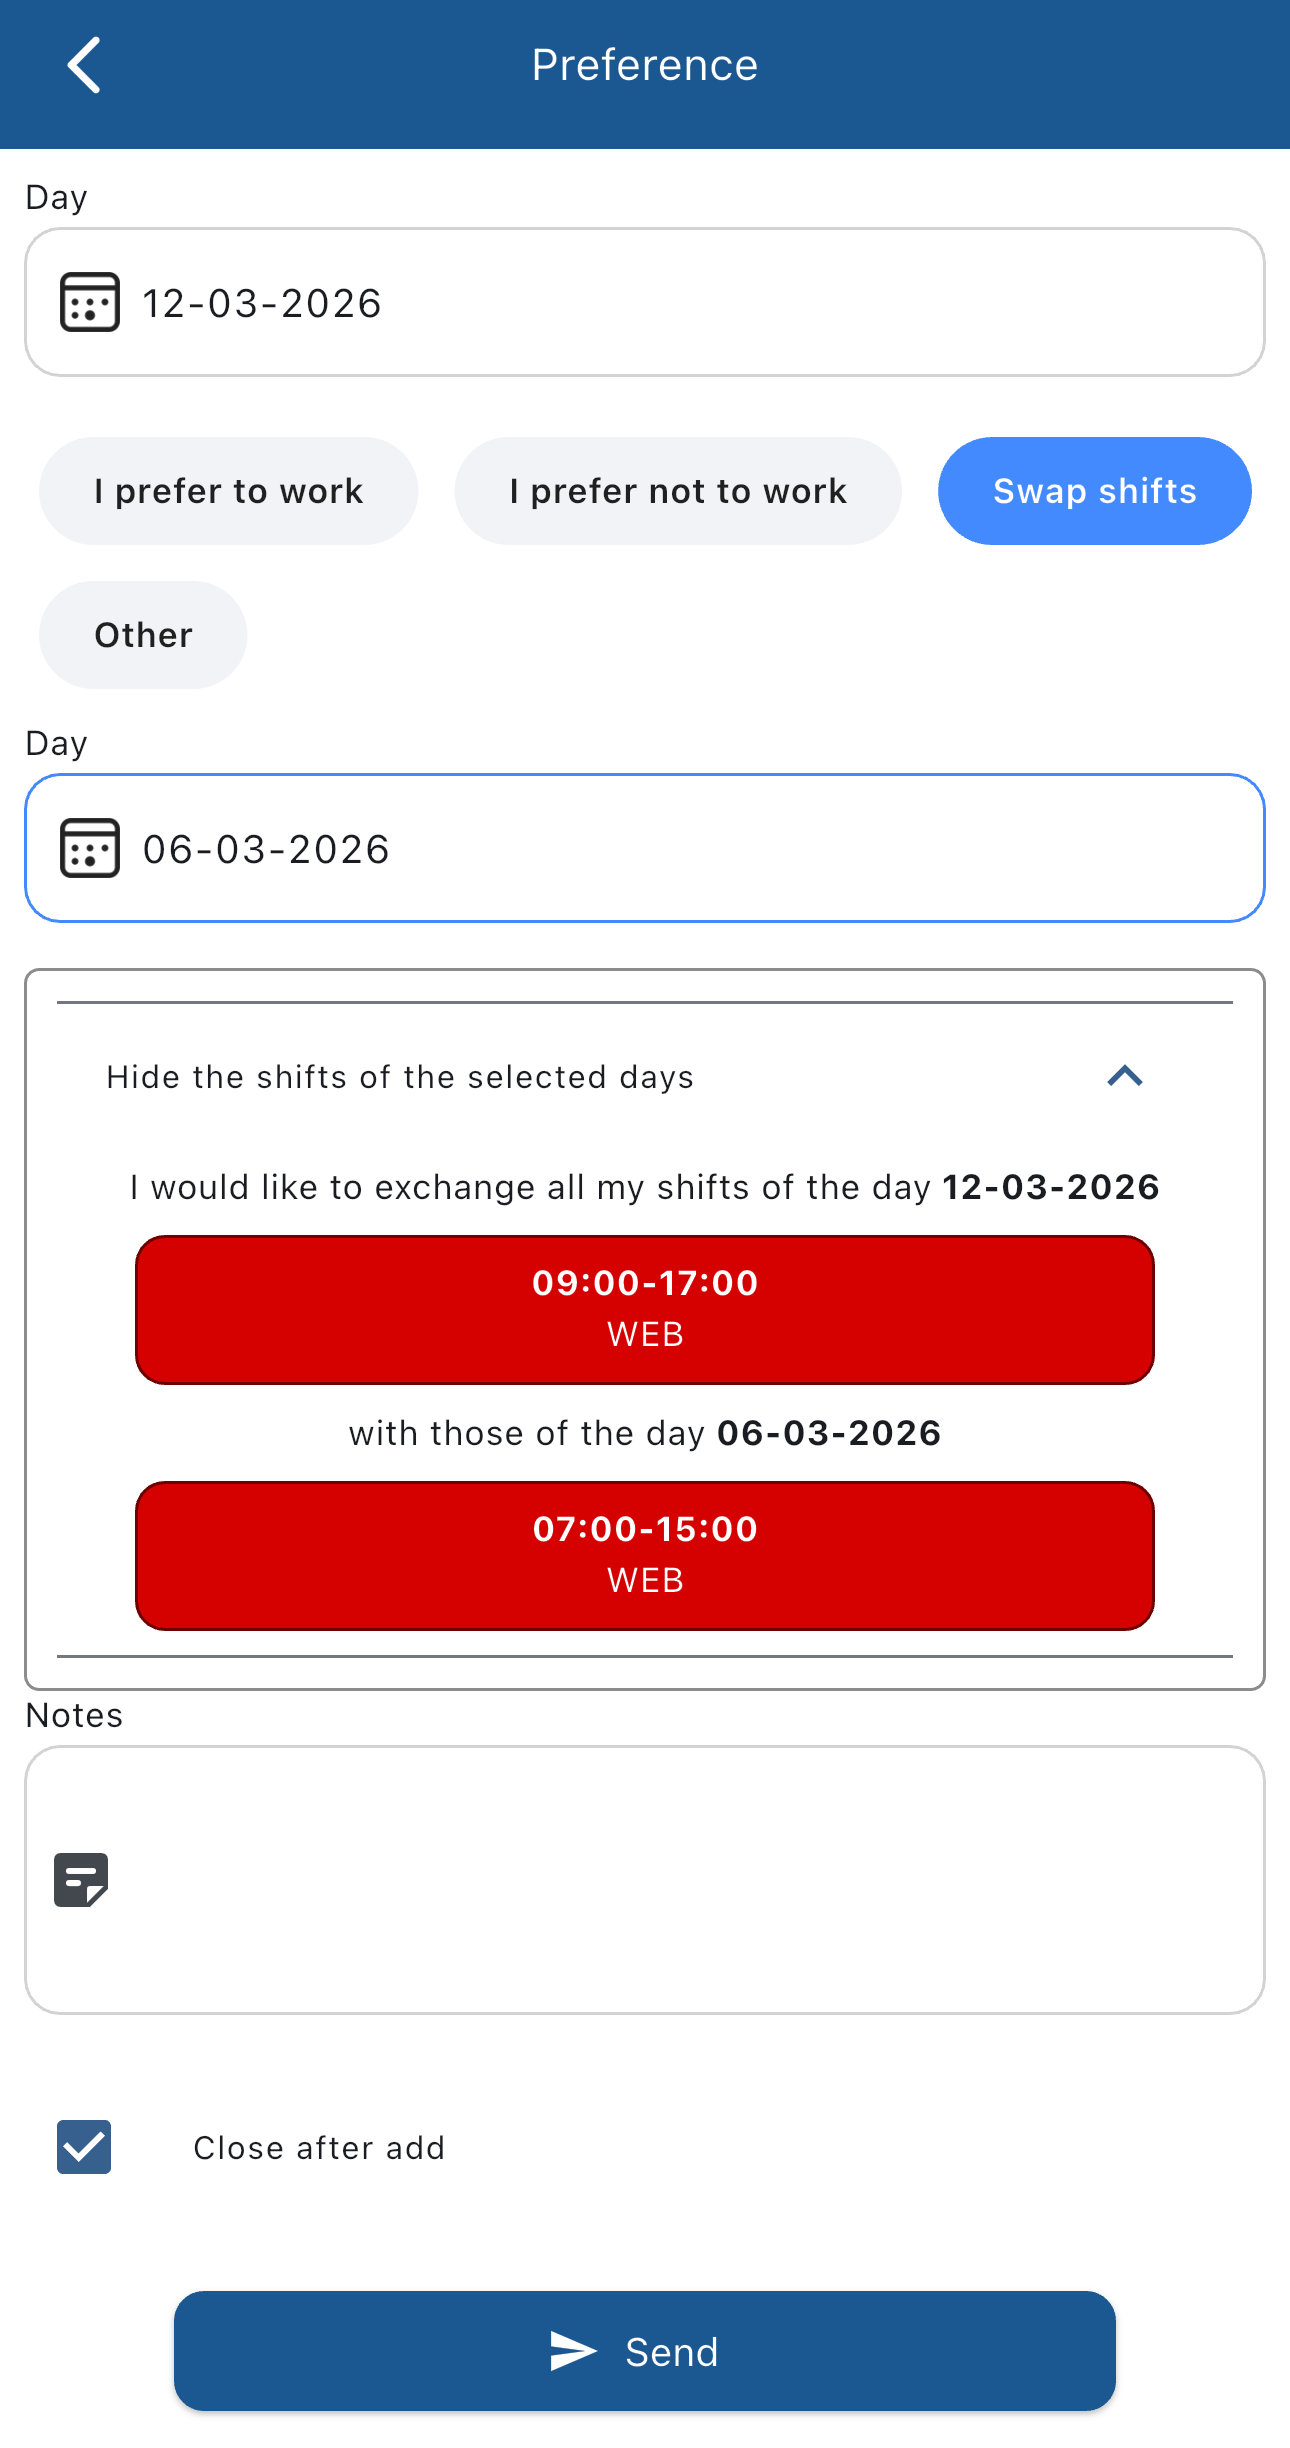
From here, you can choose the two days to swap shifts between and see the shifts that will be swapped if authorized by the manager.
Once you filled all the fields, tap the  button to send the request to your manager.
Adding a statistic
By tapping on the Statistic  button you can request a statistic.
Statistics can be requested for a part of a shift or for one or more days.
This view allows you to request a statistic for part of a shift:
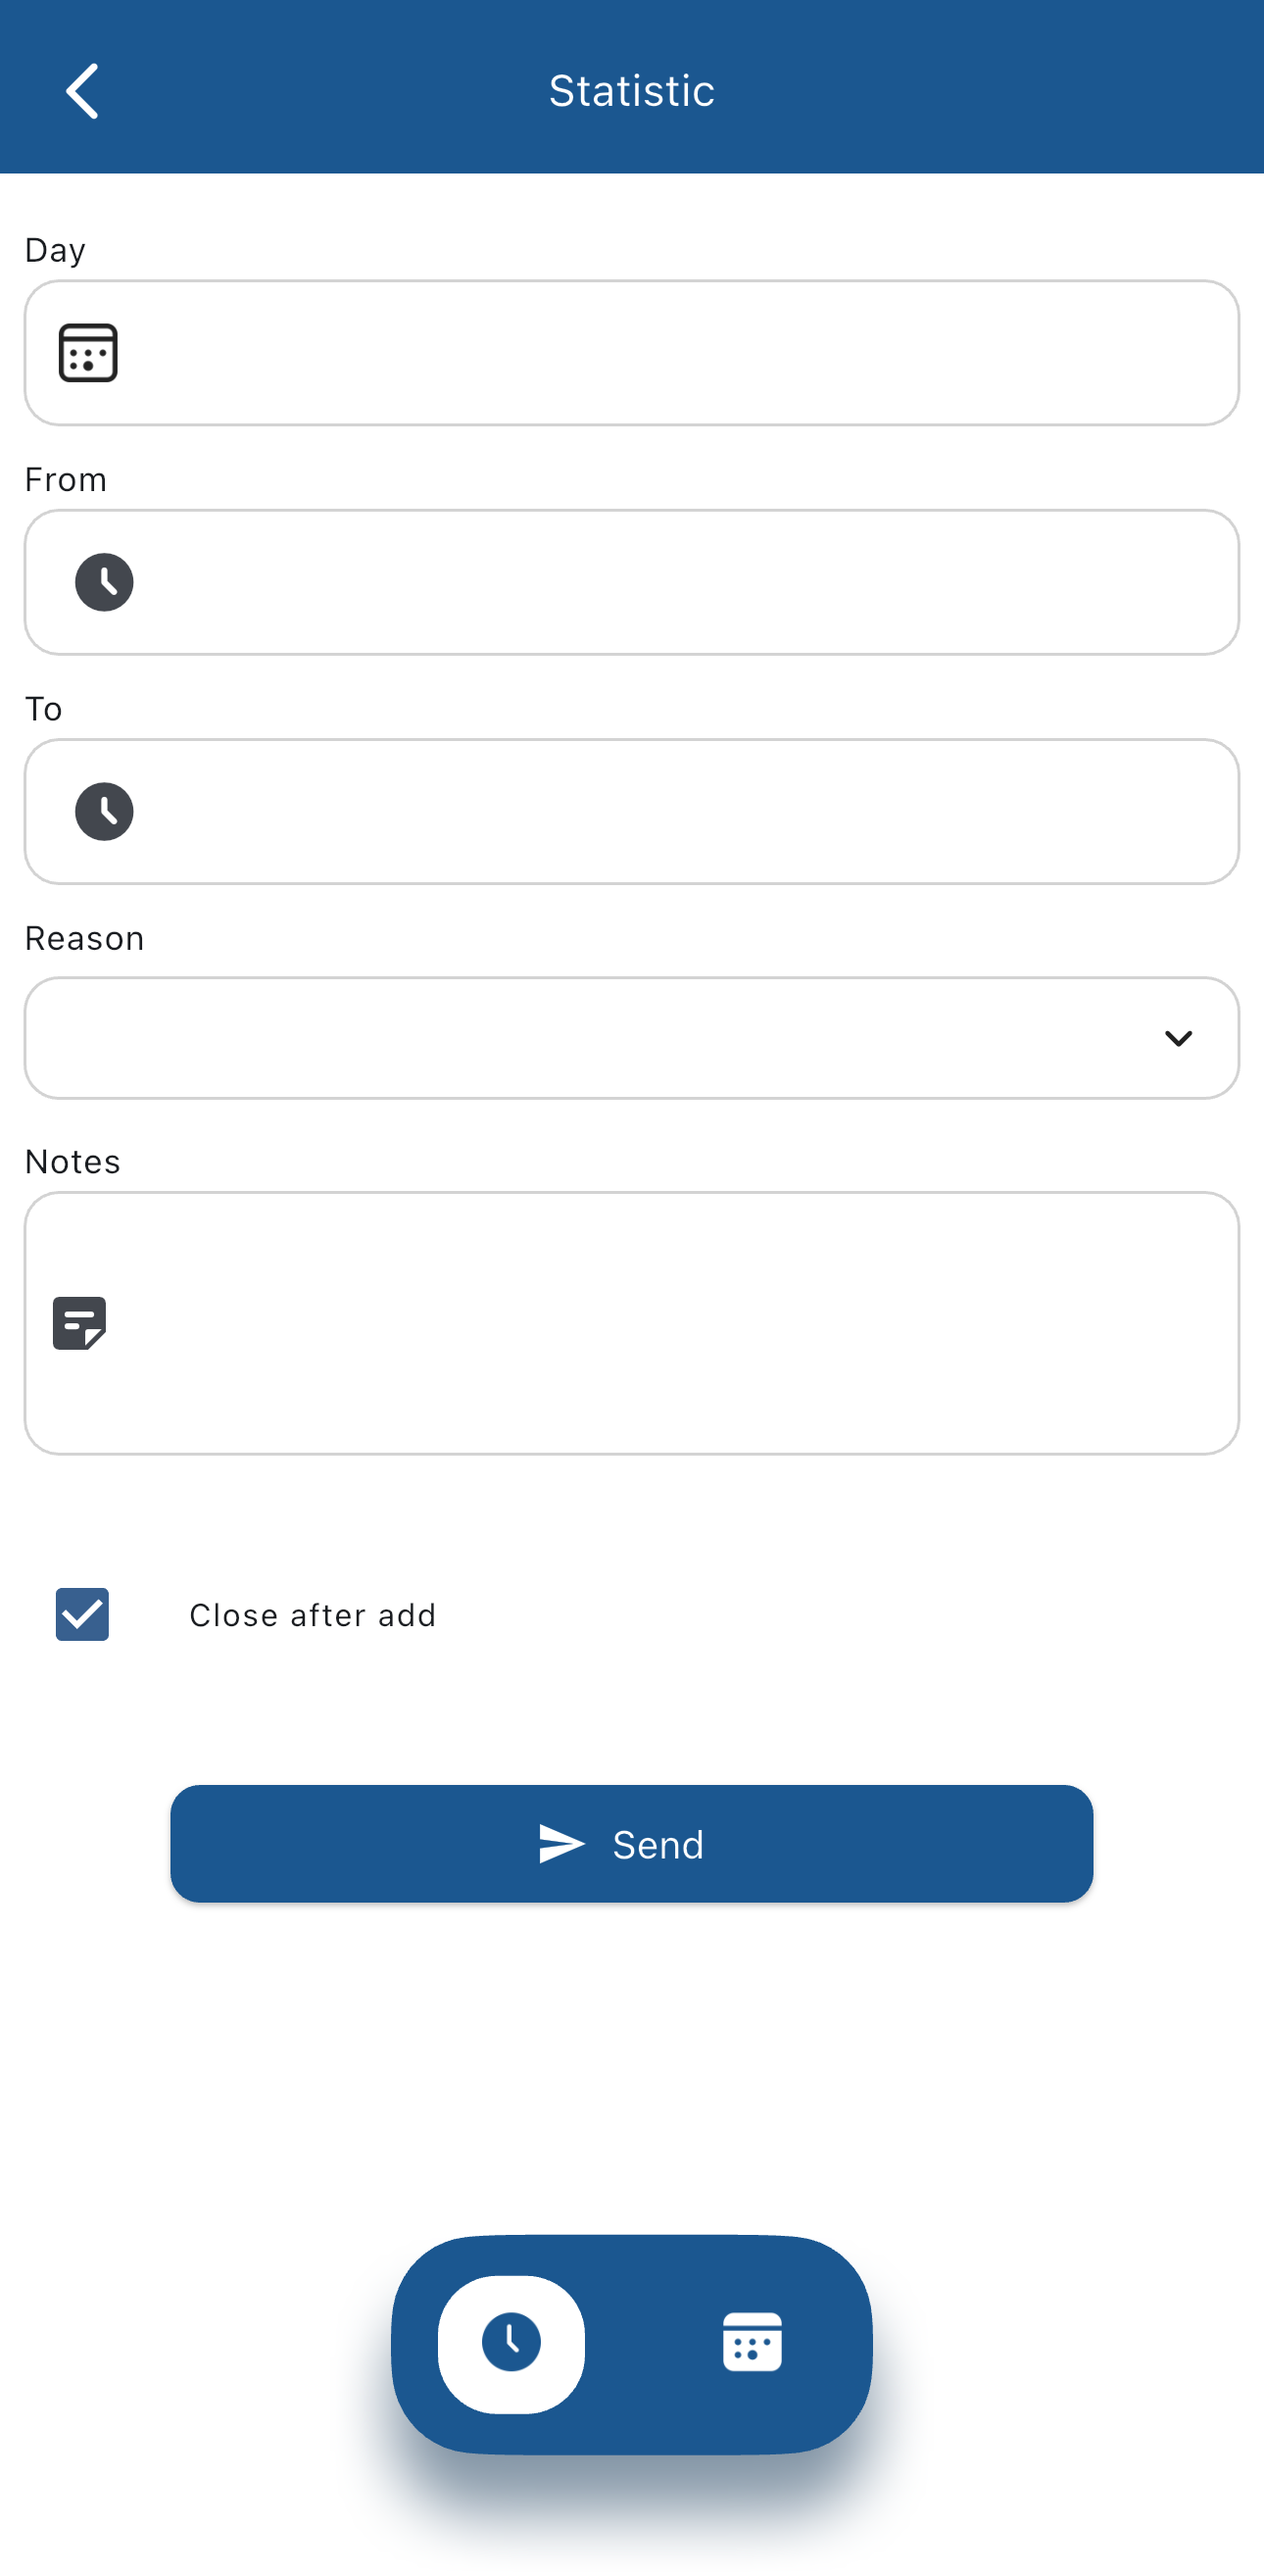
Here, you choose which day and for which time to add the request, the reason, and notes for the manager.
By tapping on the  button you can request a statistic for one or more days:

Adding overtime
By tapping on the Overtime  button you can request overtime.
Overtime can only be requested for part of a day.
This view allows you to request overtime:
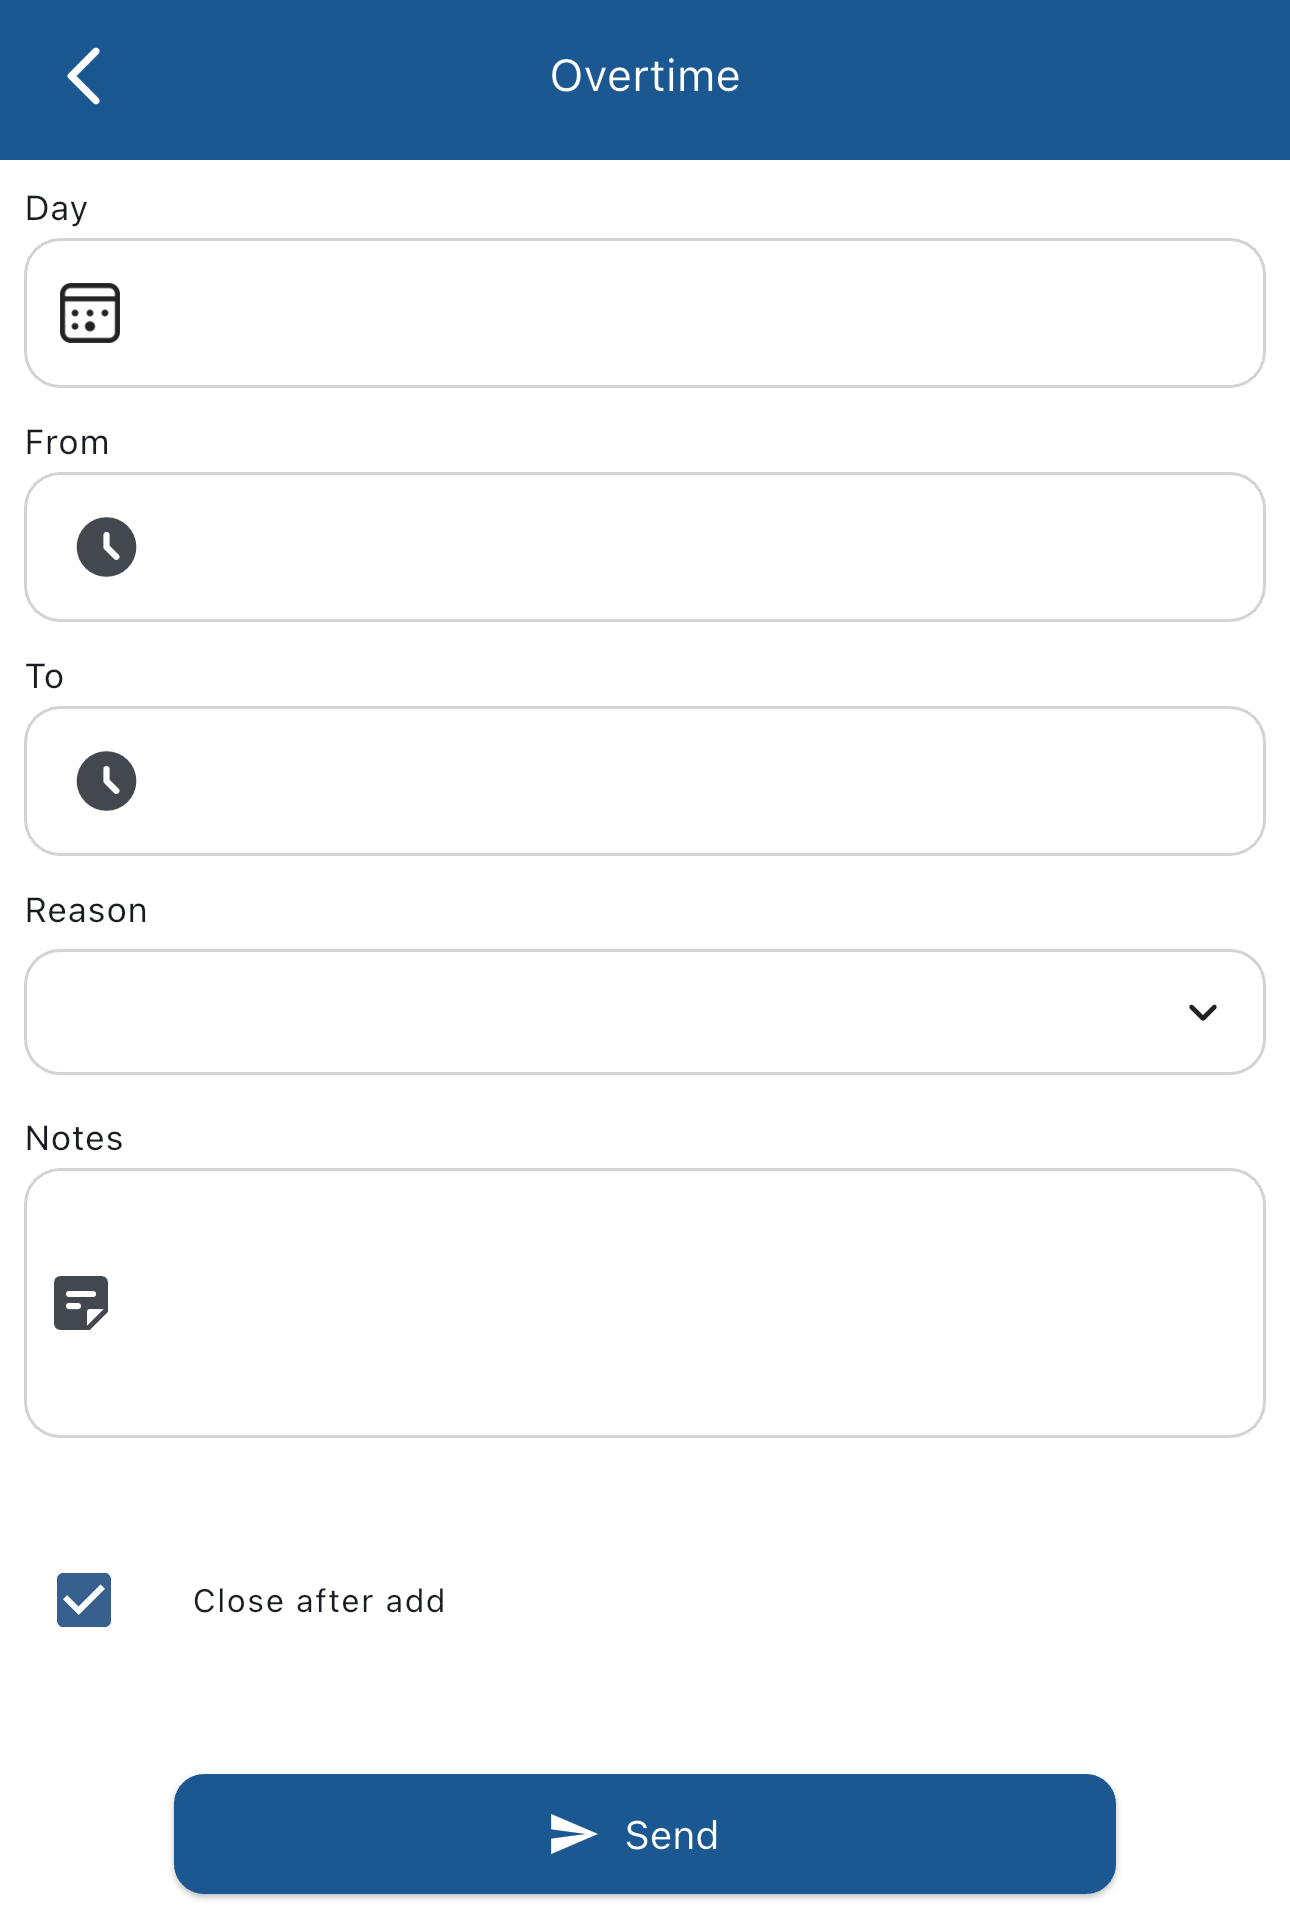
Here, you choose which day and for which time to add the request, the reason, and notes for the manager.
Adding an absence
By tapping on the Absence  button you can request an absence.
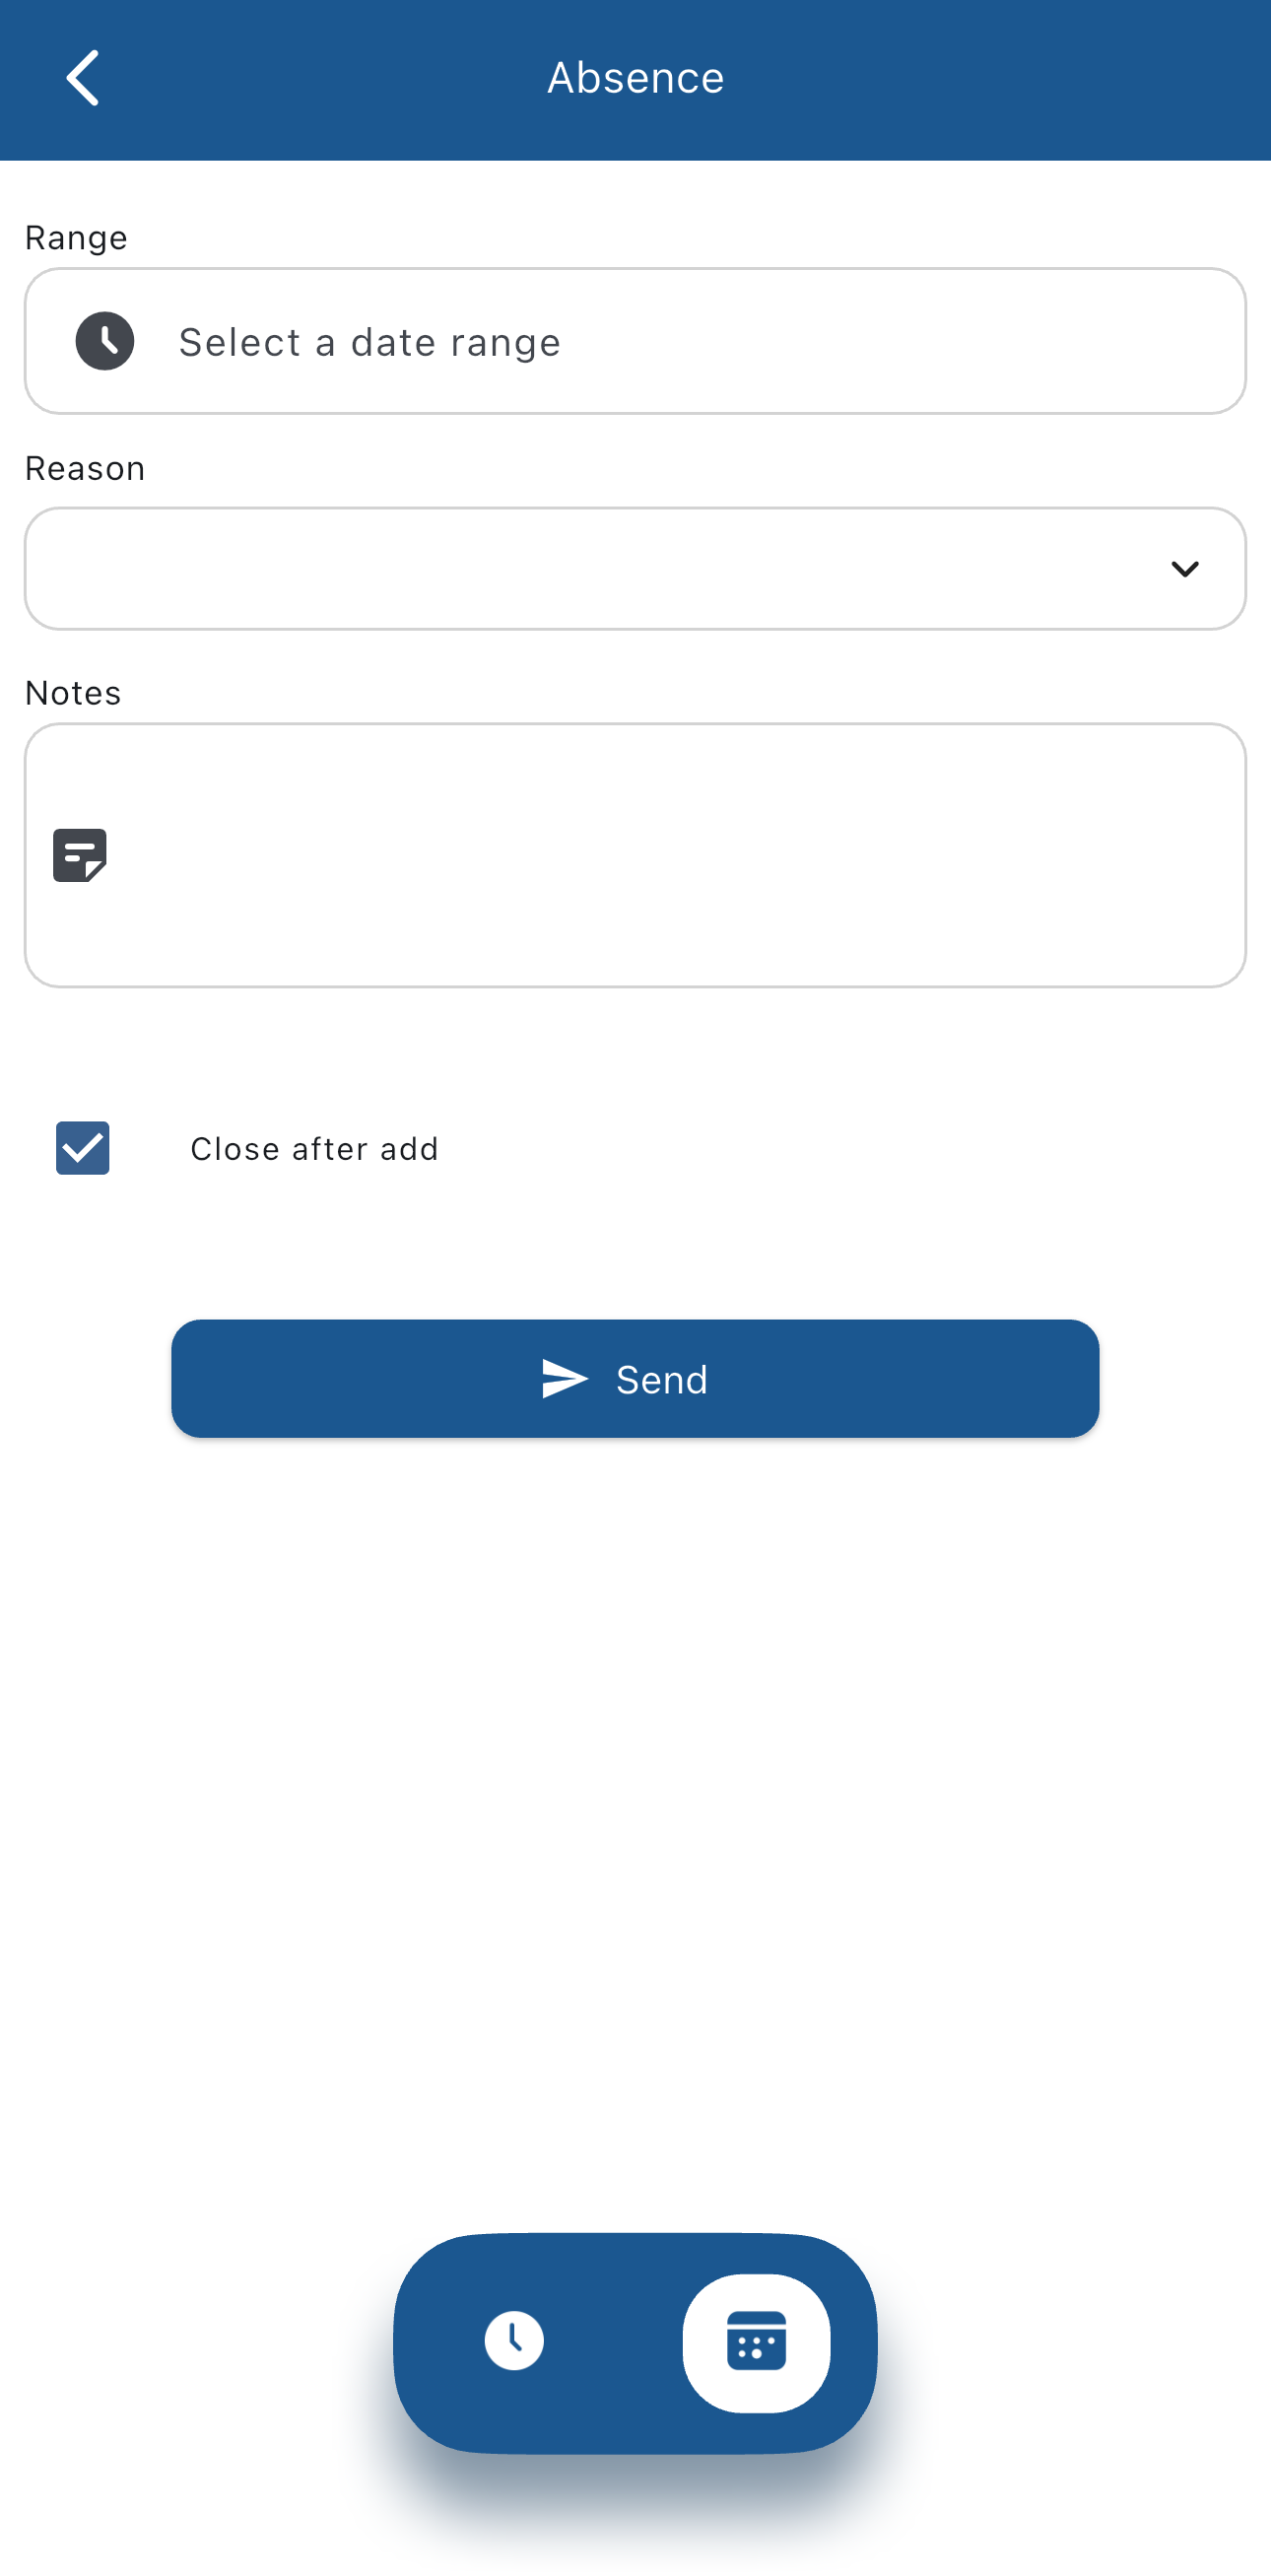
Absences can be requested for a part of a shift or for one or more days.
The default view that appears refers to part of a shift:
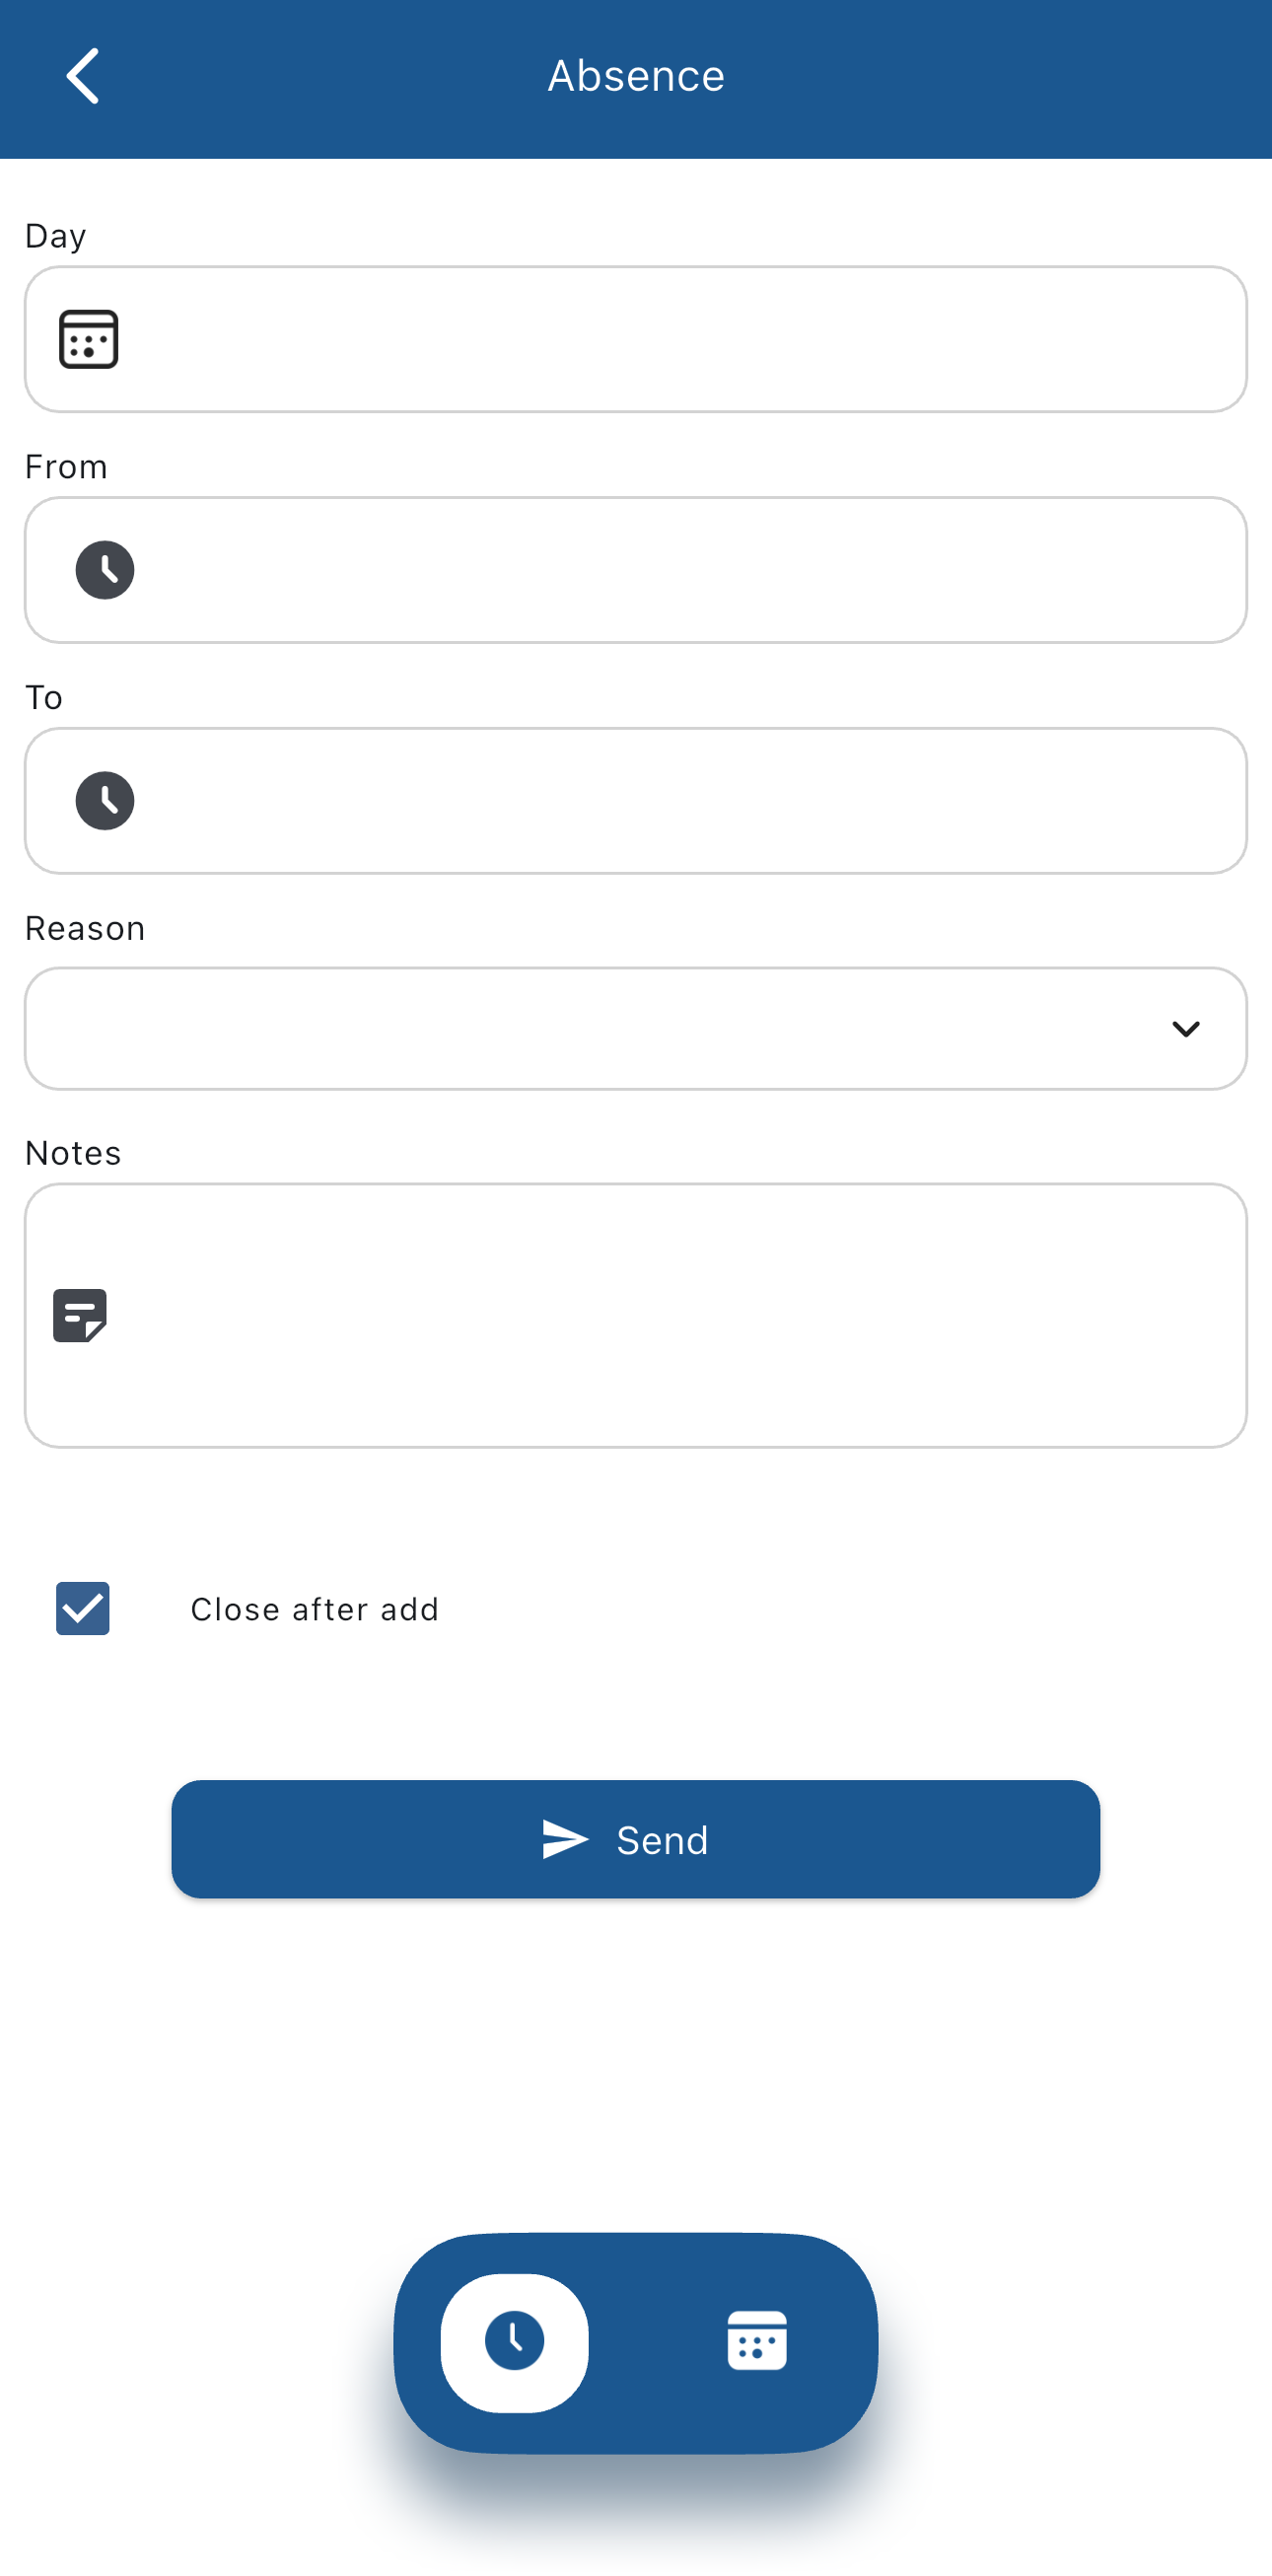
Here, you choose which day and for which time to add the request, the reason, and notes for the manager.
By tapping on the button you can require an absence for one or more days:
The navigation bar
The navigation bar is at the top of the screen in the shifts view:
Some buttons could be hidden depending on your company's configuration.
The navigation bar buttons
The 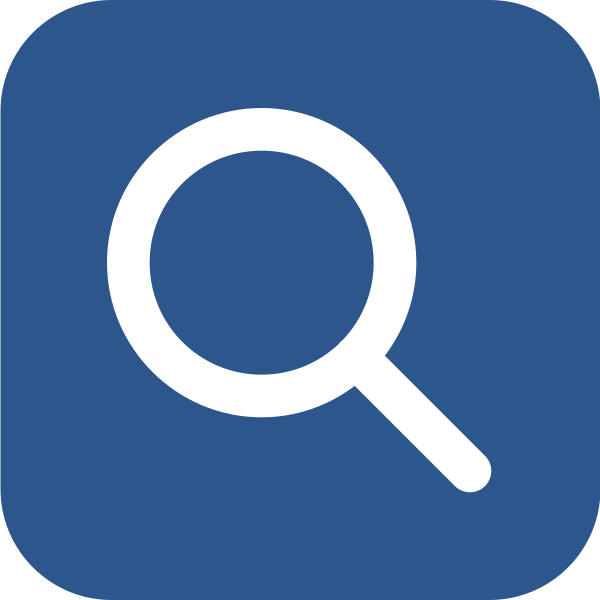 button opens this view, from which you can choose a day to jump to:
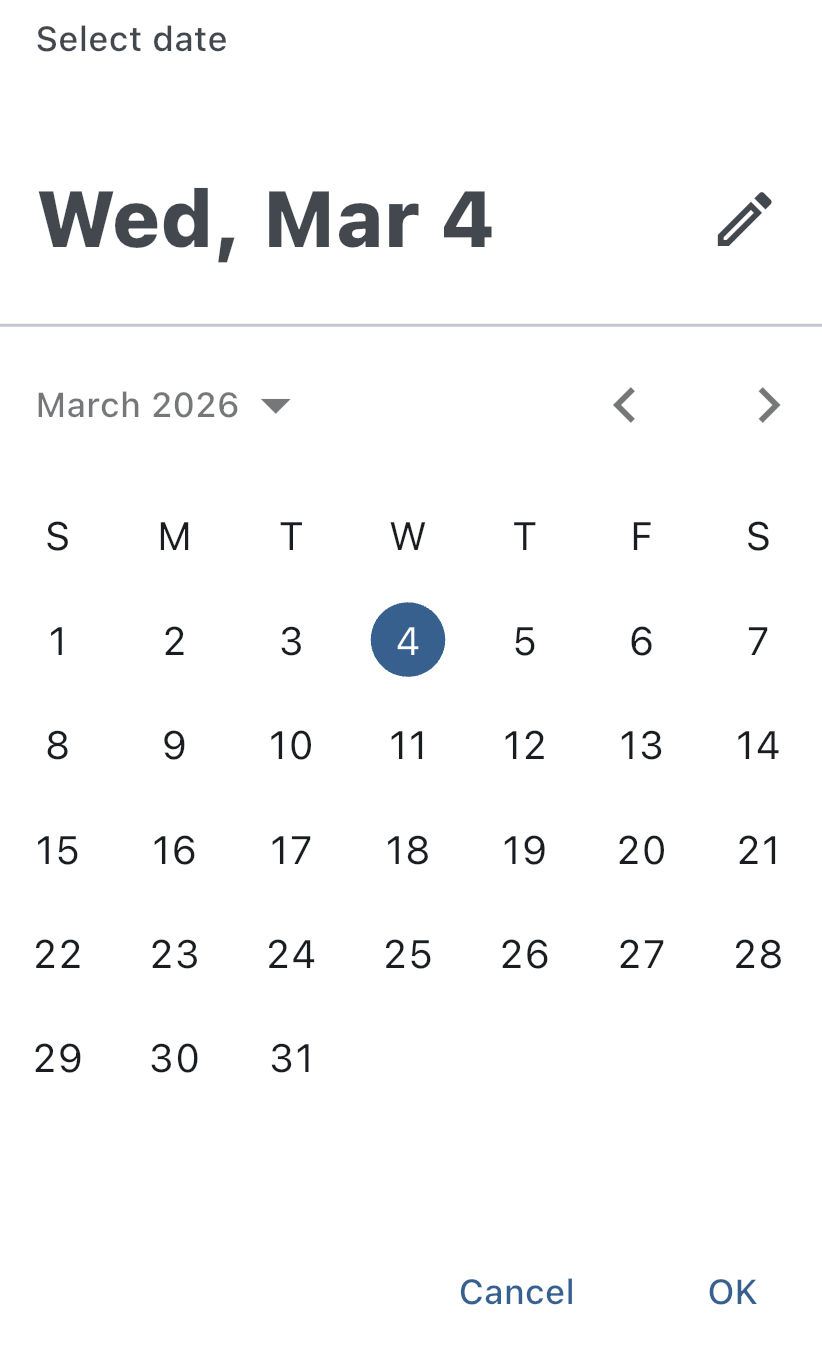
Tap on the day you want to jump to and then tap OK and the shifts view will jump to that day.
The 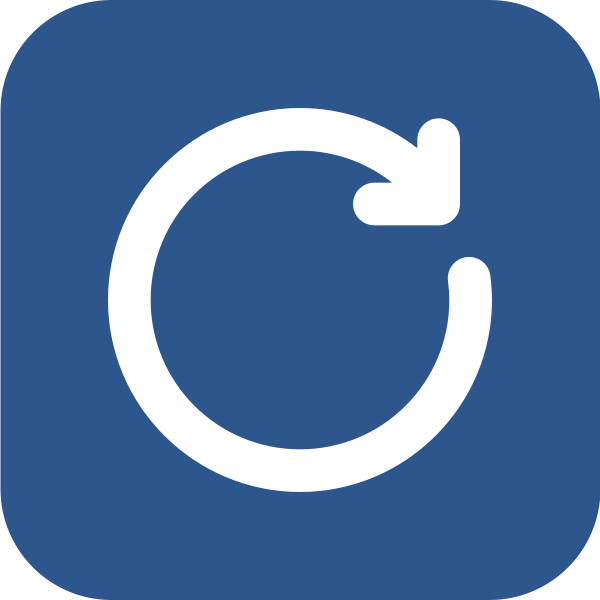 button updates the shift view manually. If you're seeing outdated information or are having problems viewing your shifts, tap this button to update the view.
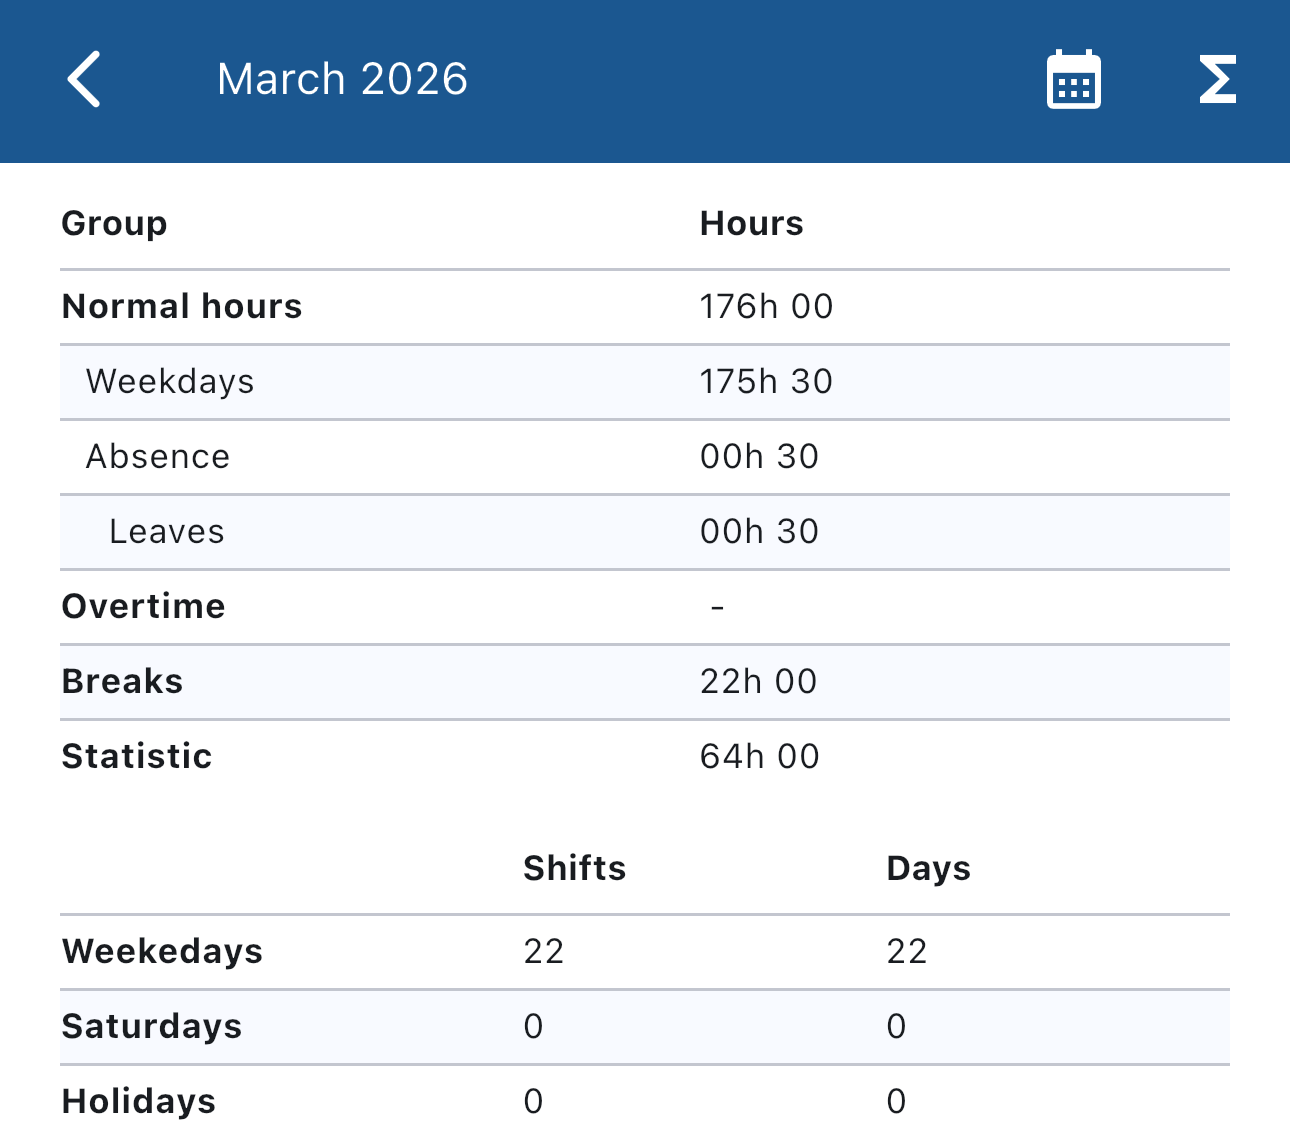
The  button shows monthly stats like the amount of hours you worked, the total absence, overtime and statistic hours, and breaks.
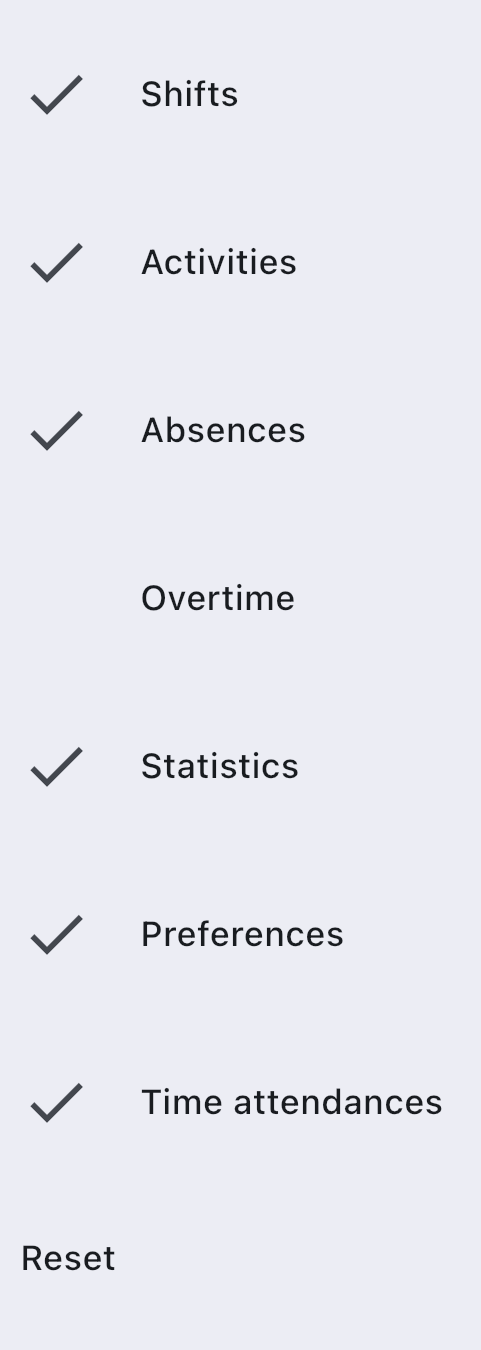
With the  button you can choose to hide elements from the shifts view.
The ticked elements will be shown, the others will be hidden.
button you can choose to hide elements from the shifts view.
The ticked elements will be shown, the others will be hidden.
If you're hiding one or more elements you will see a yellow badge on the filter button  and a Reset button at the end of the list do disable the filter and show all elements:
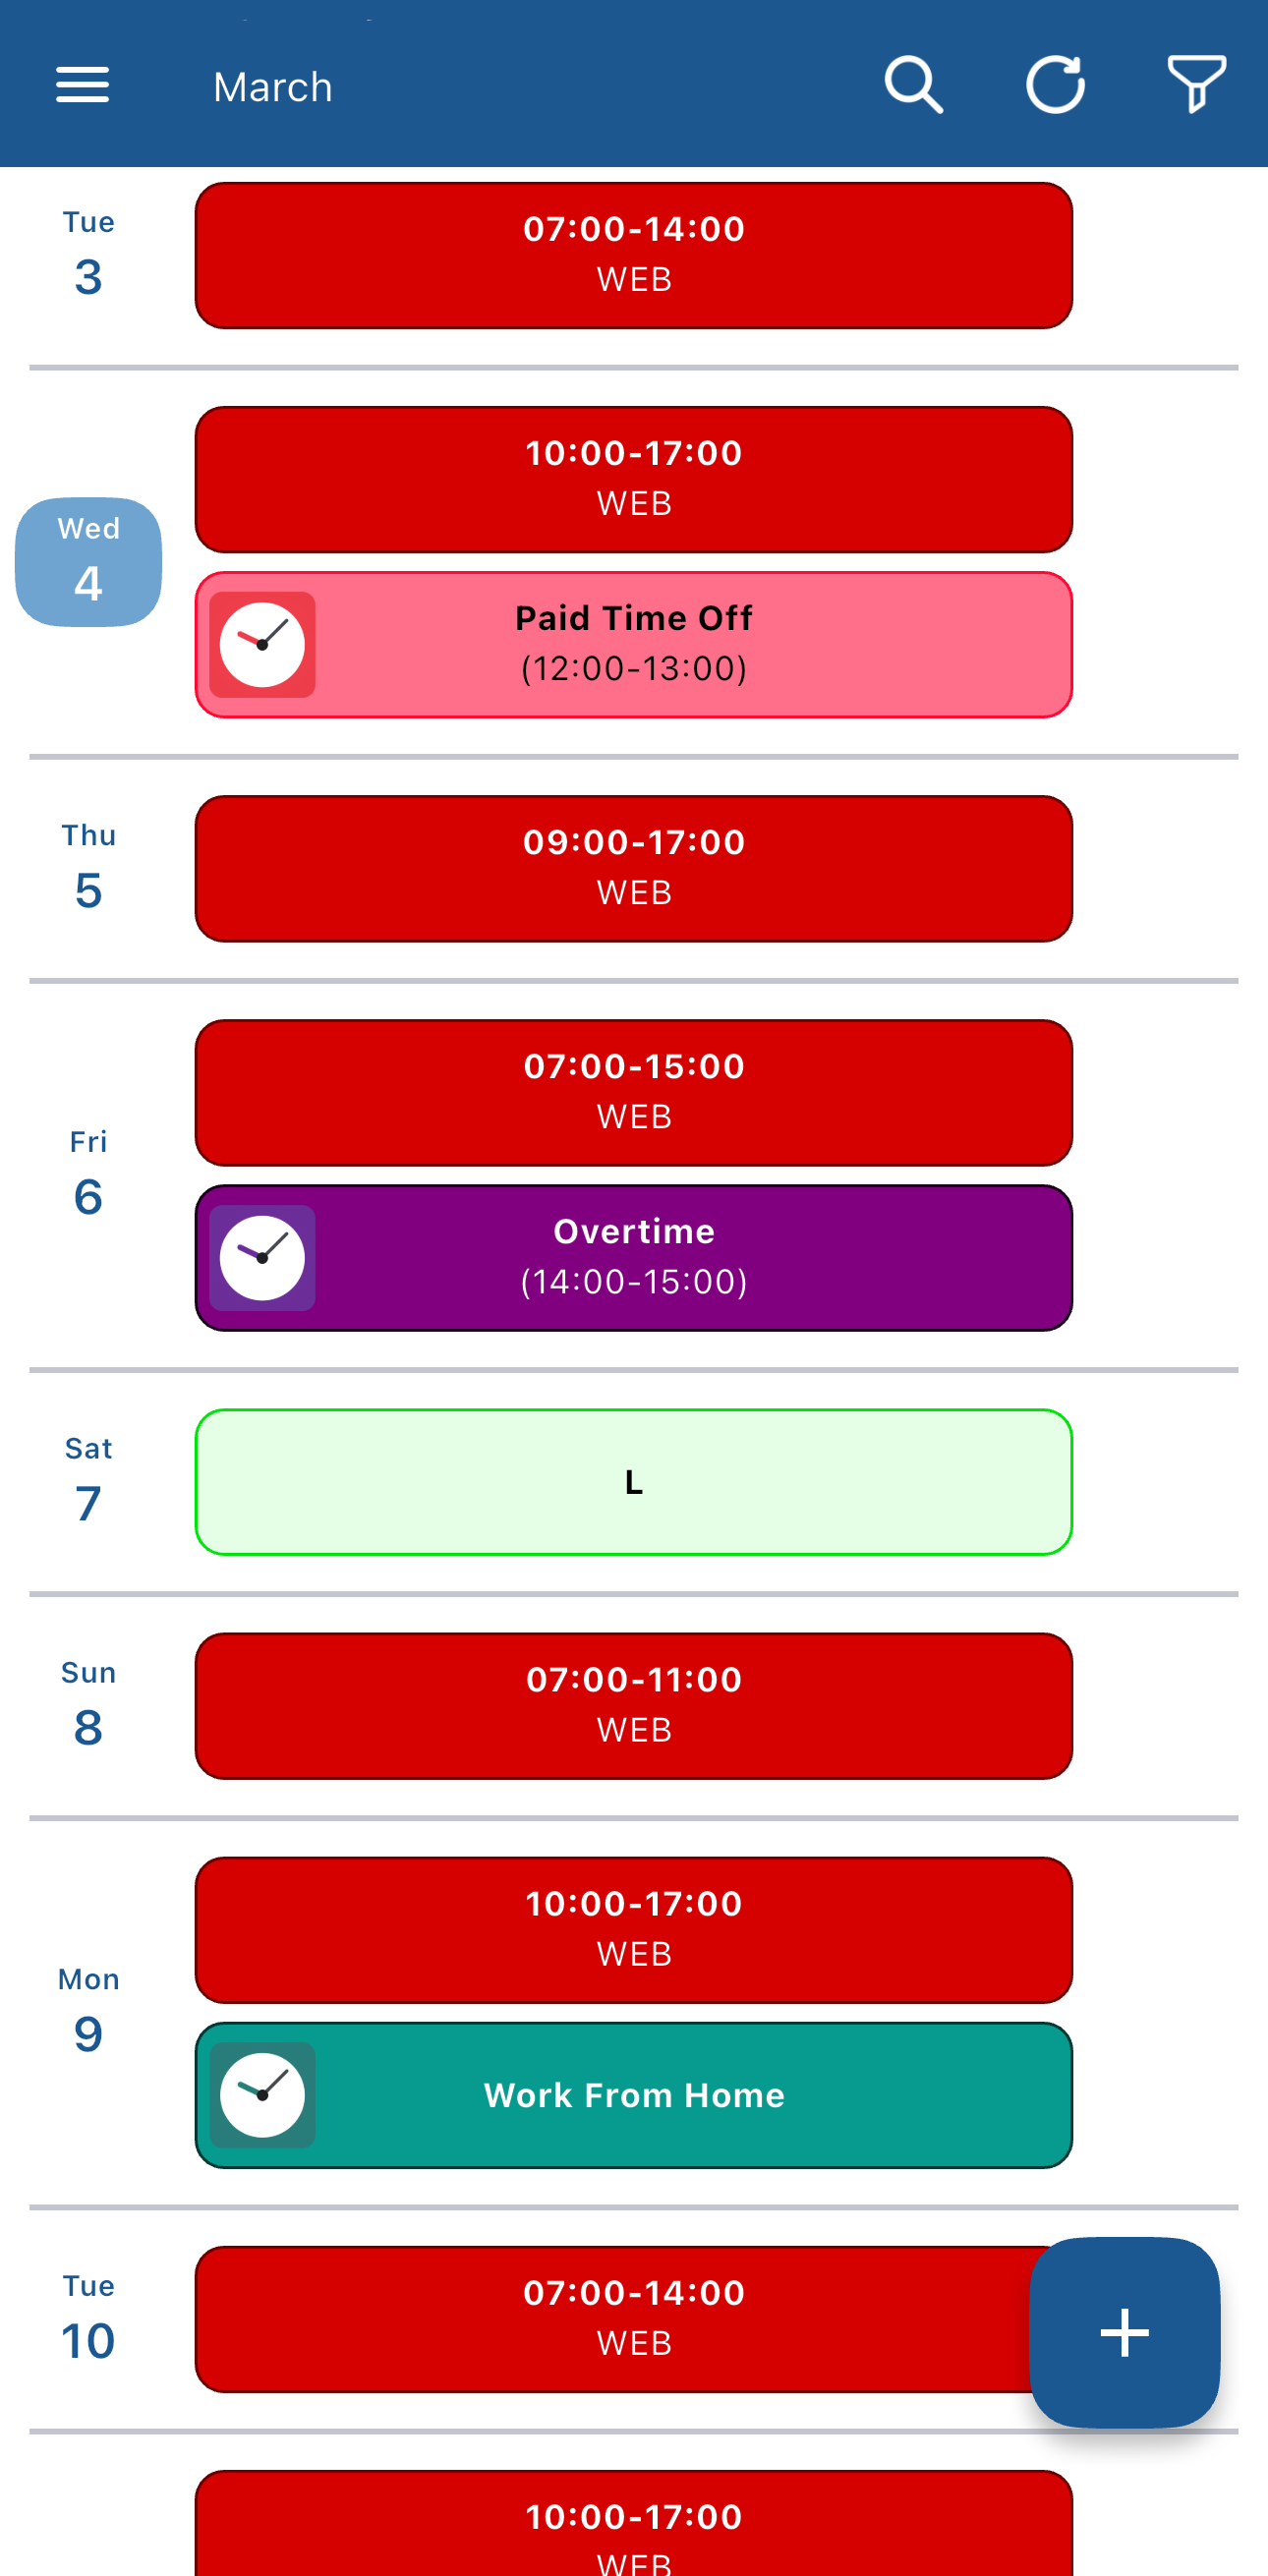
The monthly view
By tapping on the month in the navigation bar you can see the monthly view:
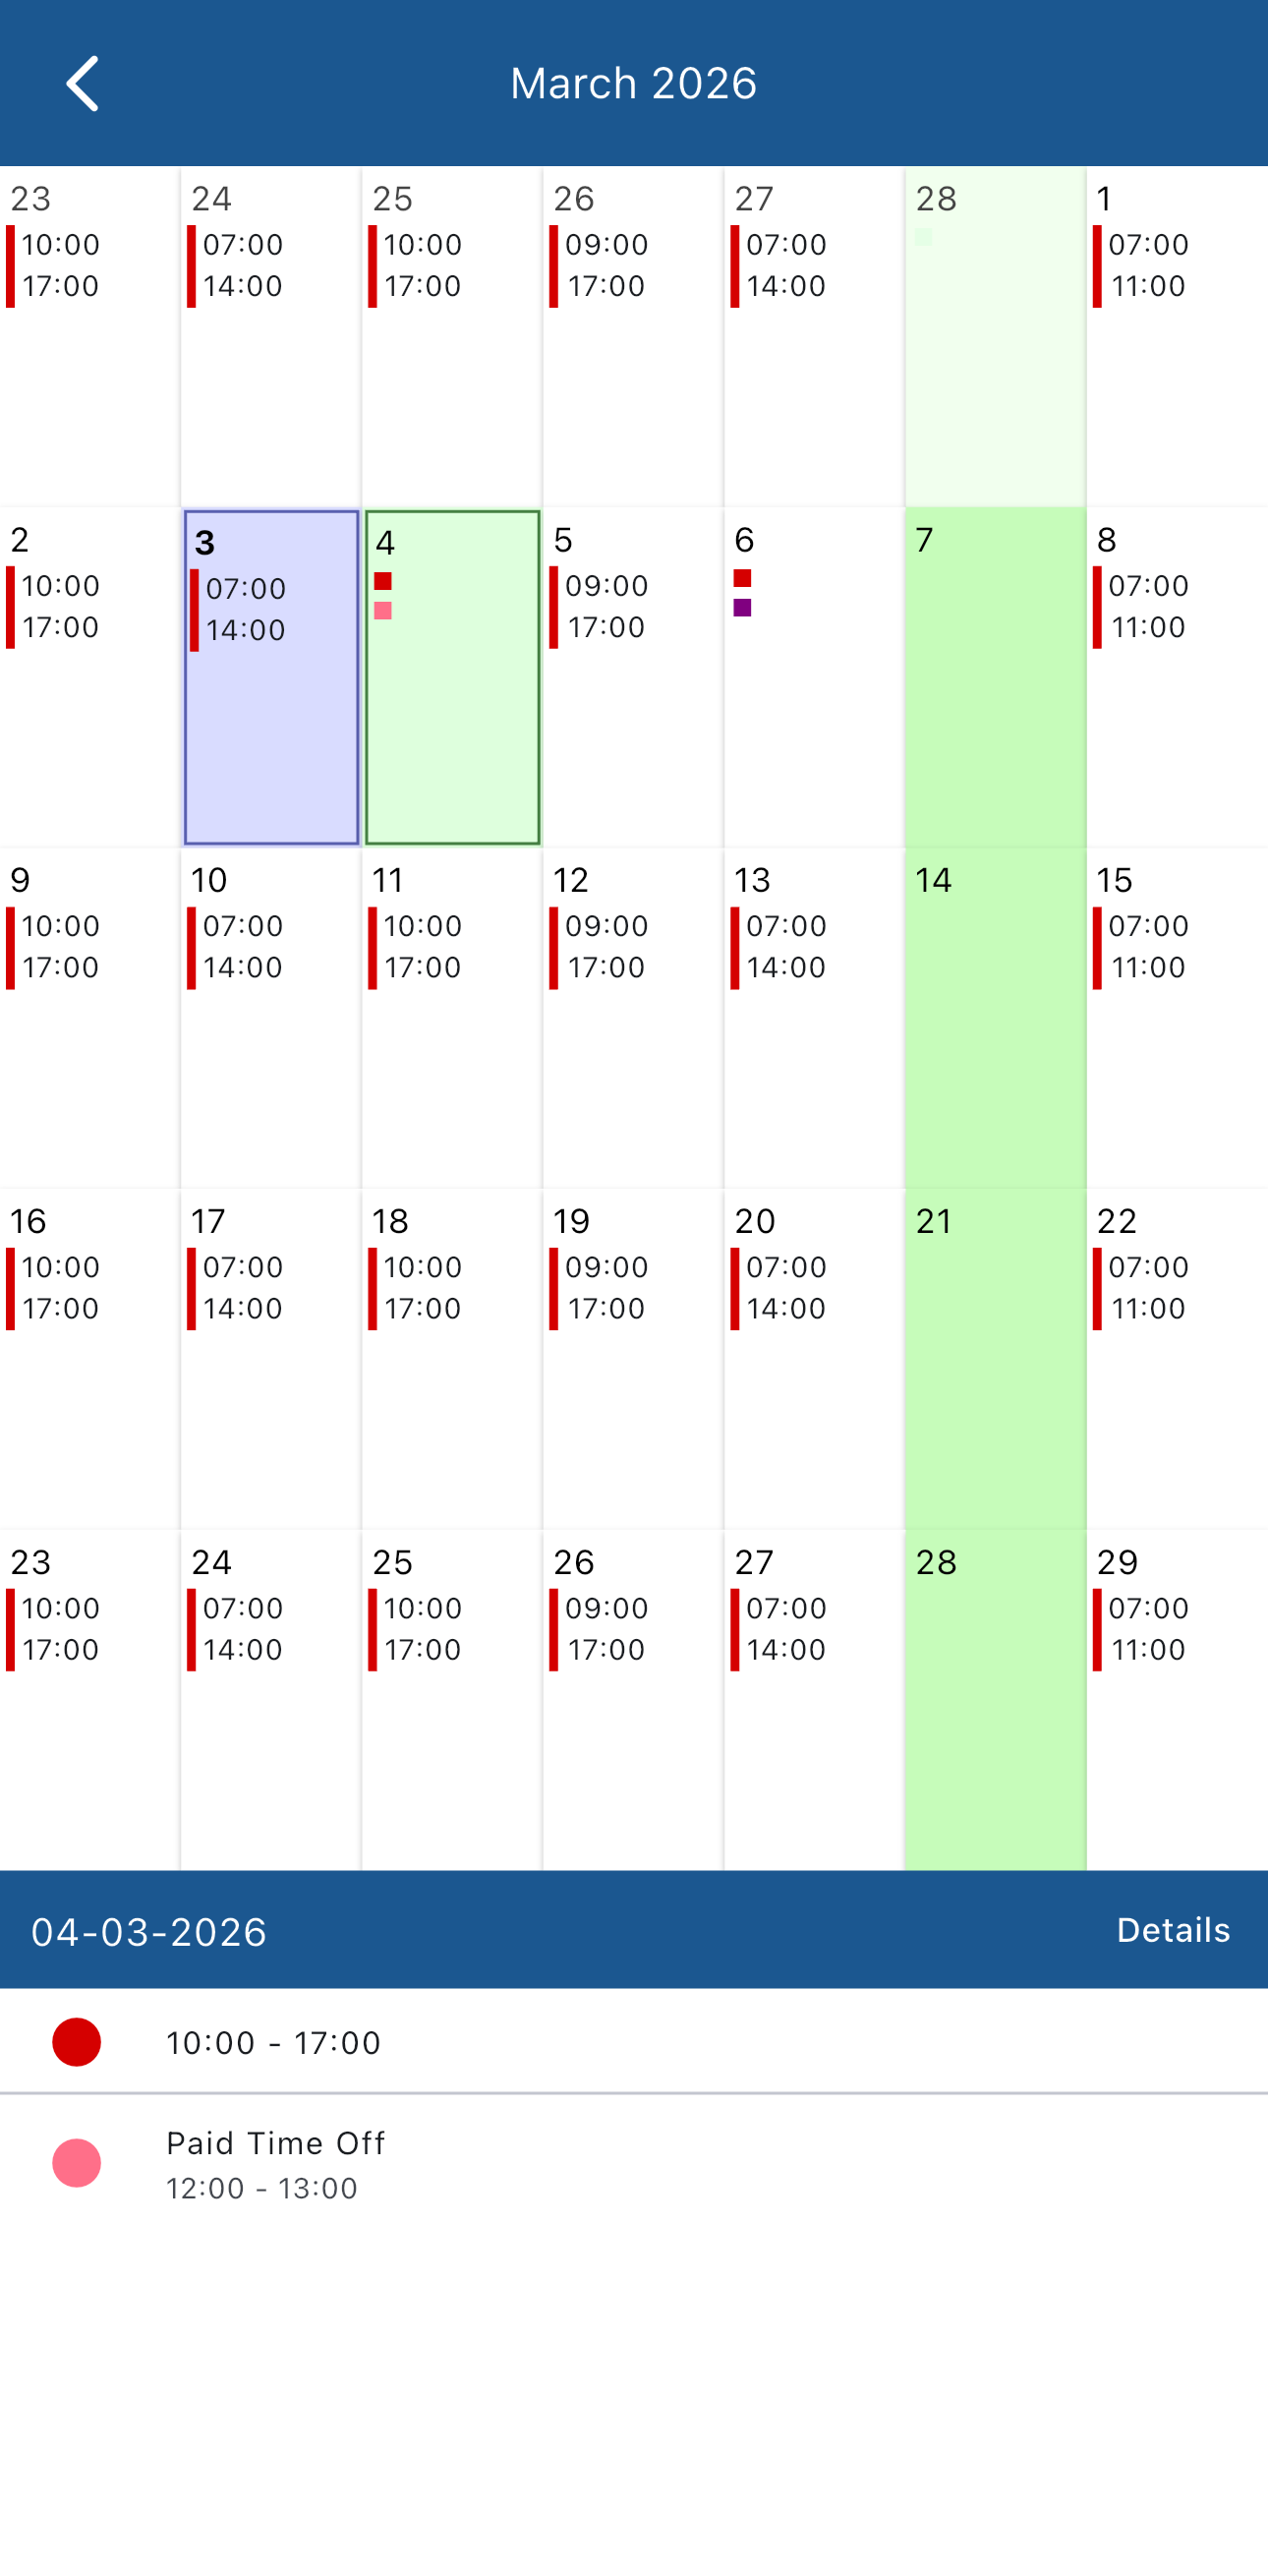
This view shows all the elements in a month in one screen, every day is a square:
- Today is the blue square
- If you tap on a day you can select it, and it becomes a green square. You can see details about the selected day in the lower part of the screen.
- Elements that take up one ore more whole days color the whole square (in the example screenshot above there are leave shifts on the 7th, the 14th, the 21st and the 28th of March, and color the square green)
- Elements that cover part of a shift are represented as smaller squares in a day (you can see overtimes in purple on March 6th and absences in red on March 4th in the example screenshot above)
Menu
Tapping on the  button brings up the menu bar:
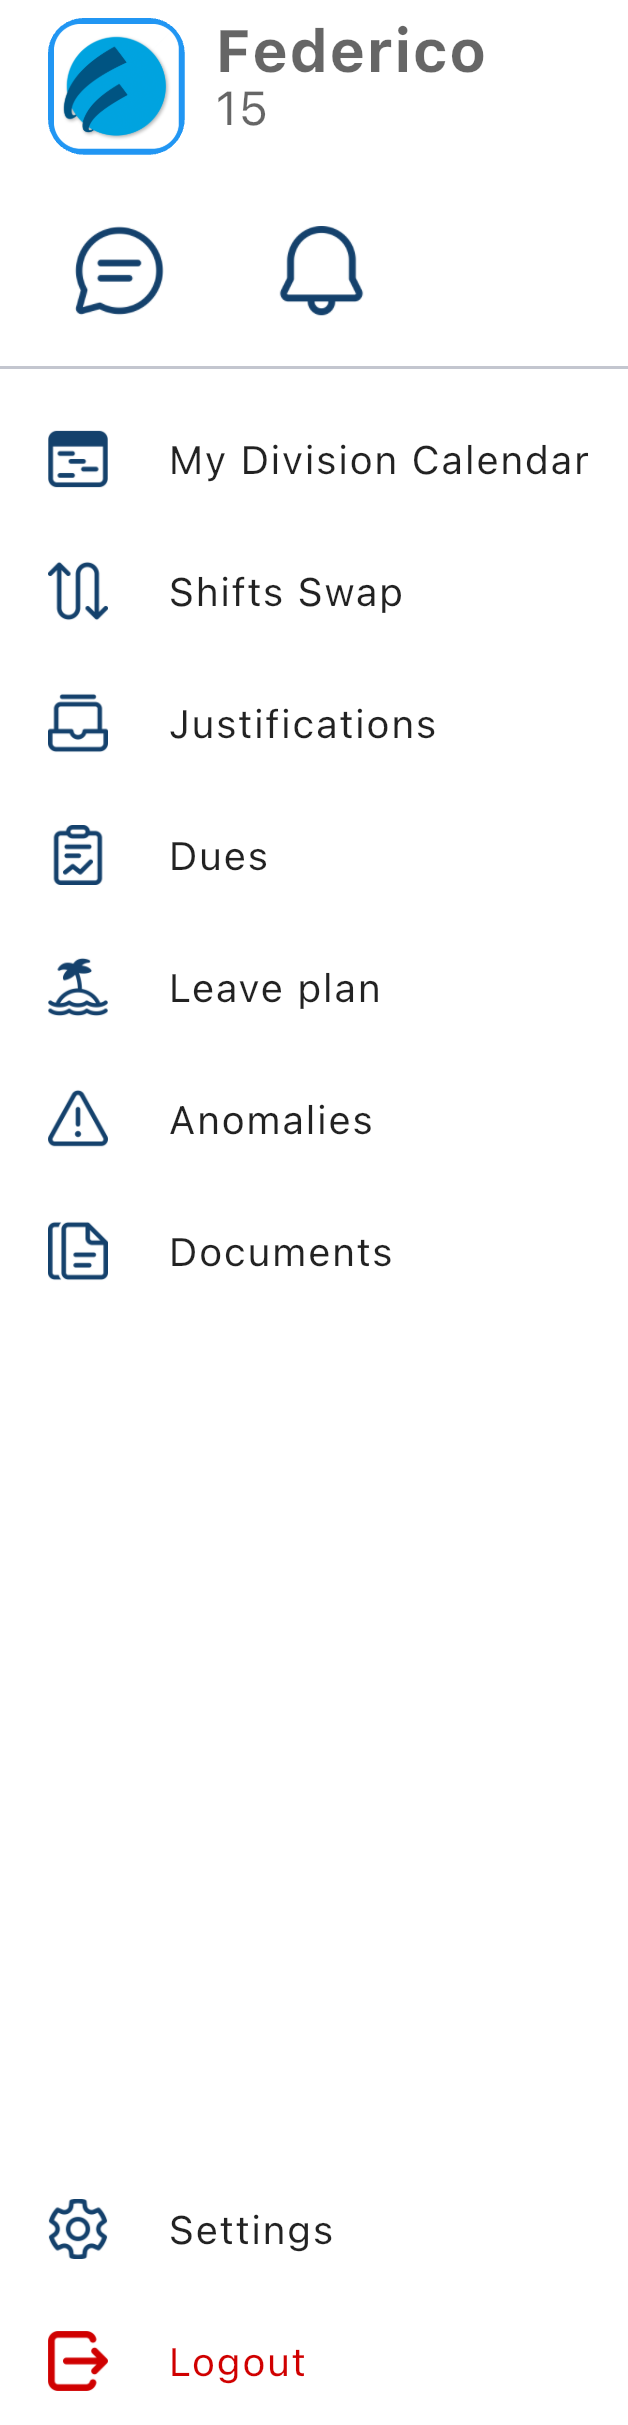
Depending on your company's policies, you may not see one or more menu items.
Let's go through all the menu bar menu items one by one. In the top left is your profile picture, your name and your ID.
Under that there are two buttons, one for messaging  and one for notifications
  .
.
If there are unread messages or notifications the menu button in the shifts view will have a red badge 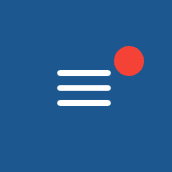 and if you open the menu bar you'll see a red badge with a number on the corresponding button.
Messages
This button opens the messaging view and allows you to message your colleagues or managers. This works like a normal messaging app.
Notifications
Here you can see notifications sent automatically by StaffRoster, for example if the state of an element changes(e.g. authorized/refused absence). Unread notifications have a light blue background.
My division calendar
In this view you can see your colleagues' shifts day by day. By tapping the arrows next to the date you can change the day, and you can order the shifts by employee, time or section.
By tapping the  button in the bottom bar, you can see who has leave shifts, so is not coming to work for that day.
By tapping the
button in the bottom bar, you can see who has leave shifts, so is not coming to work for that day.
By tapping the  button you can see who has absences for that day.
Shifts swap
If your company allows it, you can request to swap one or more shifts with your colleagues
Before we start, there are a few rules to consider:
- You can swap shifts at least 48 hours in the future
- You can swap more than one shift at a time
- You can't swap shifts that have absences or statistics
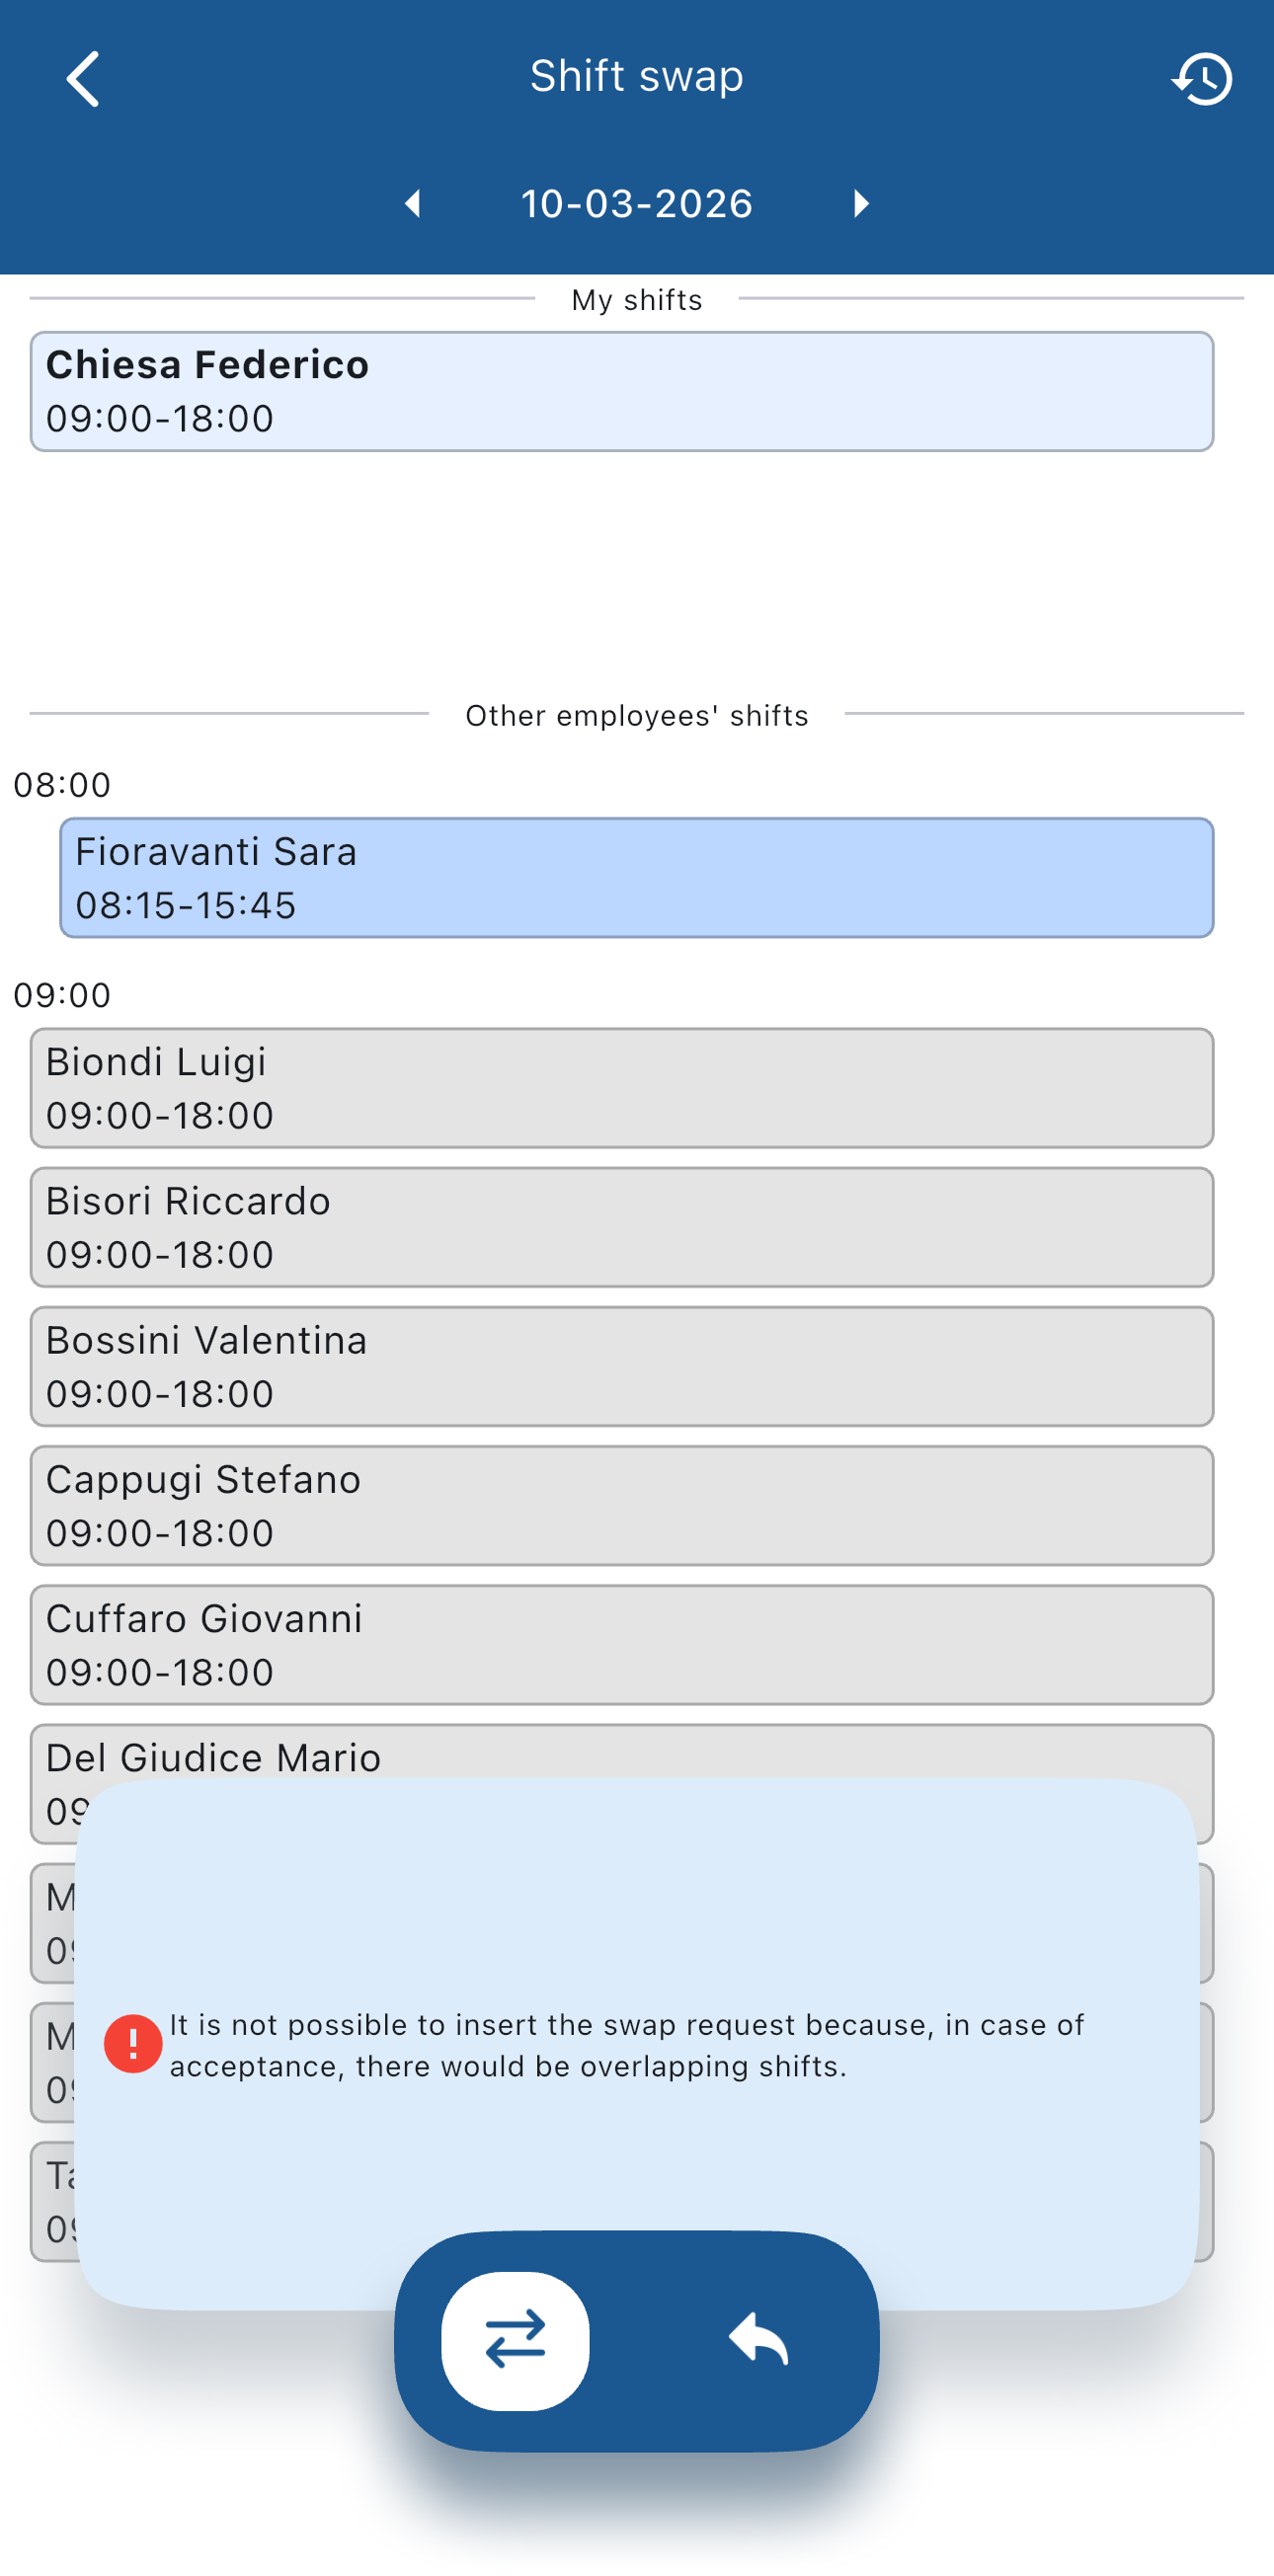
The main shifts swap view is the following:
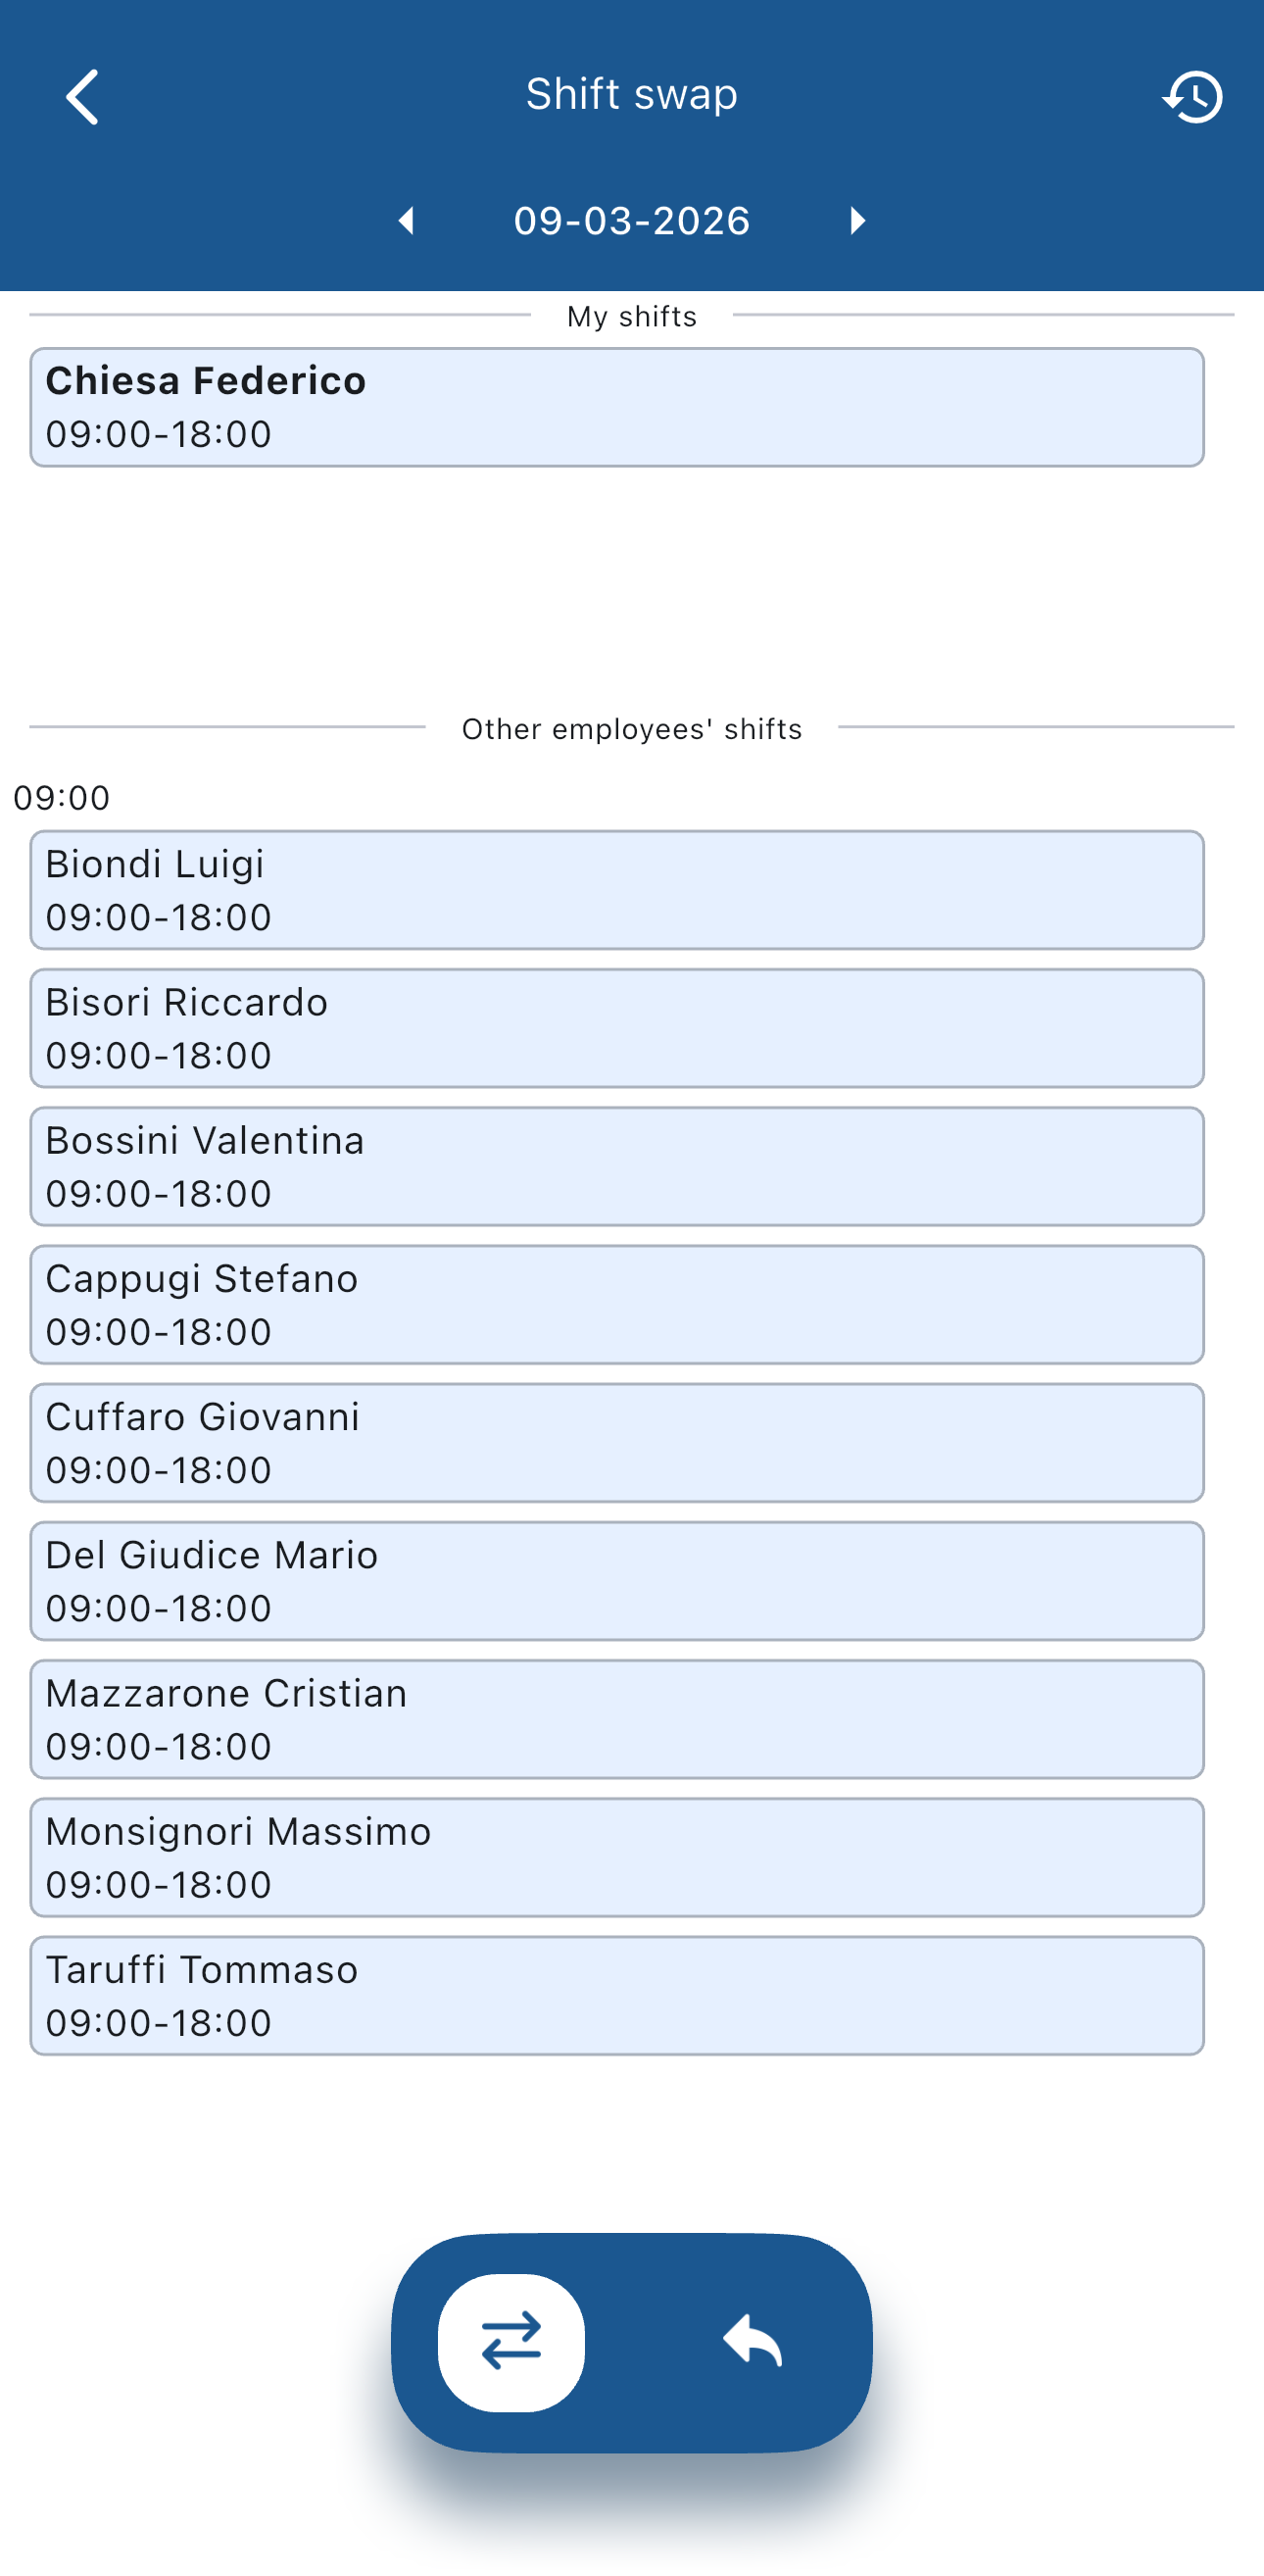
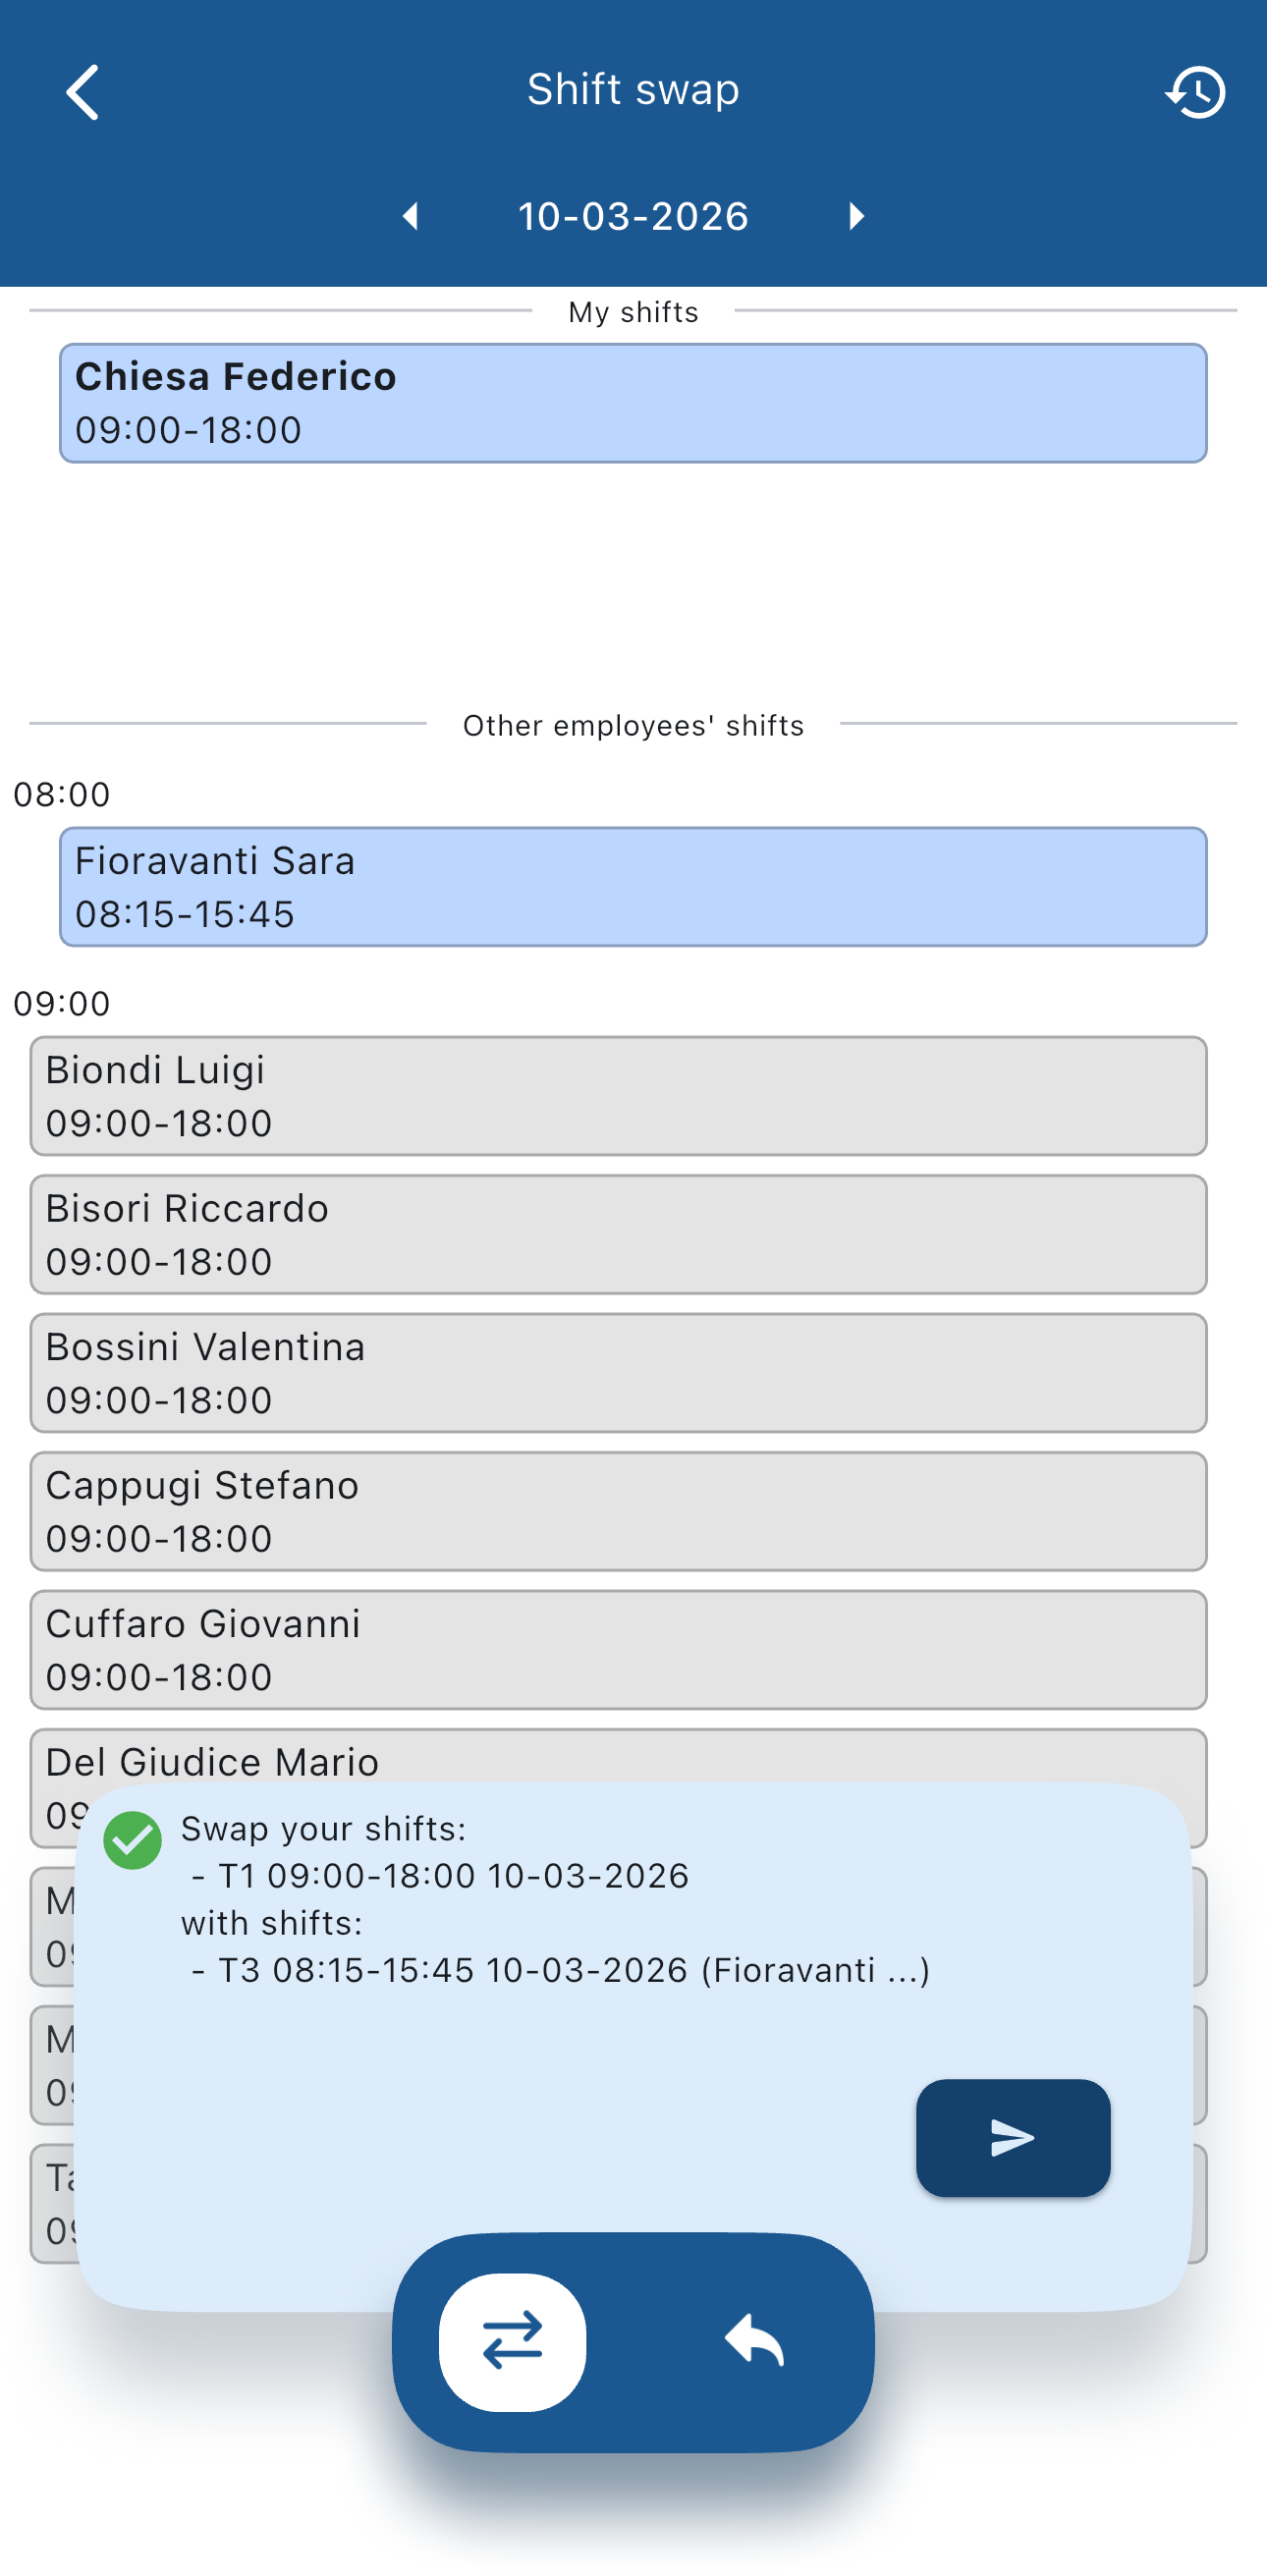
To swap a shift, tap on your shift and then tap on the one you would like to swap with. You will see that a summary appears at the bottom of the screen.
If the swap is possible you'll see a green tick:
otherwise you'll see an error that explains why the swap isn't possible:
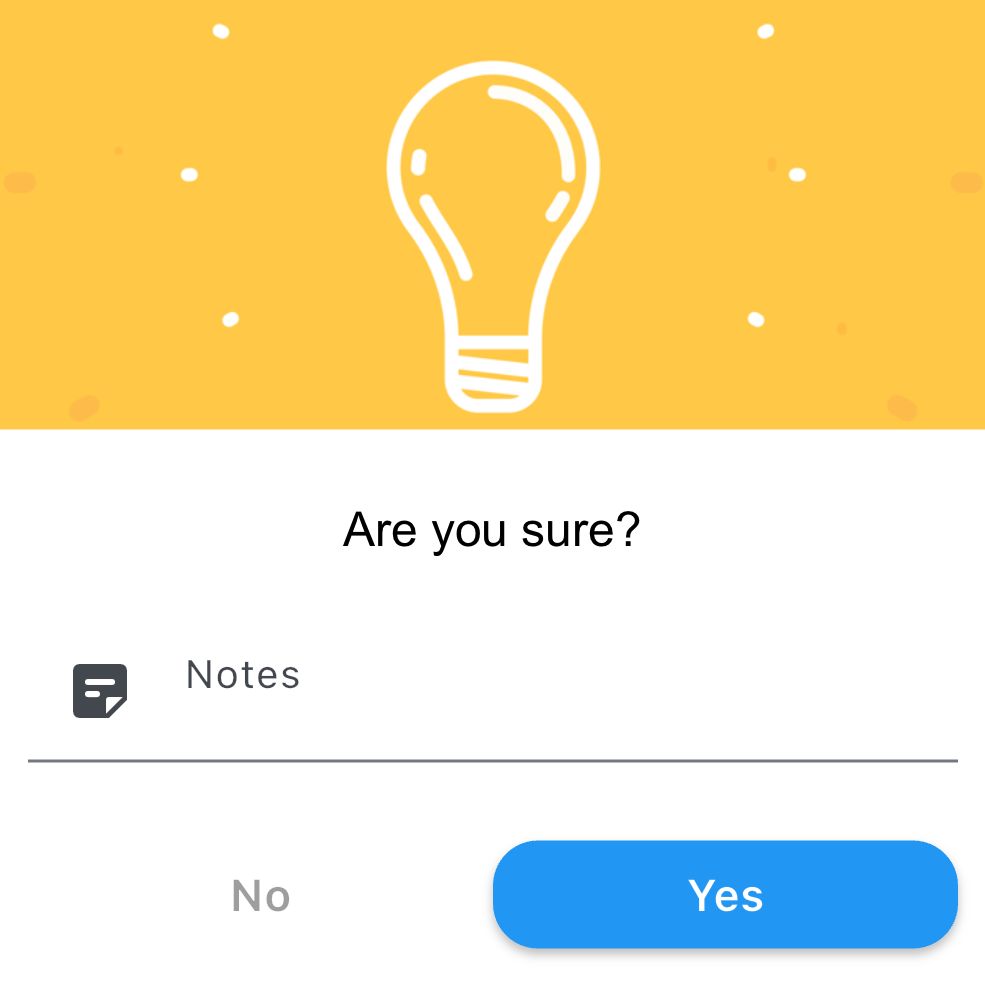
If the swap is possible, by tapping the button a confirmation dialog will appear:
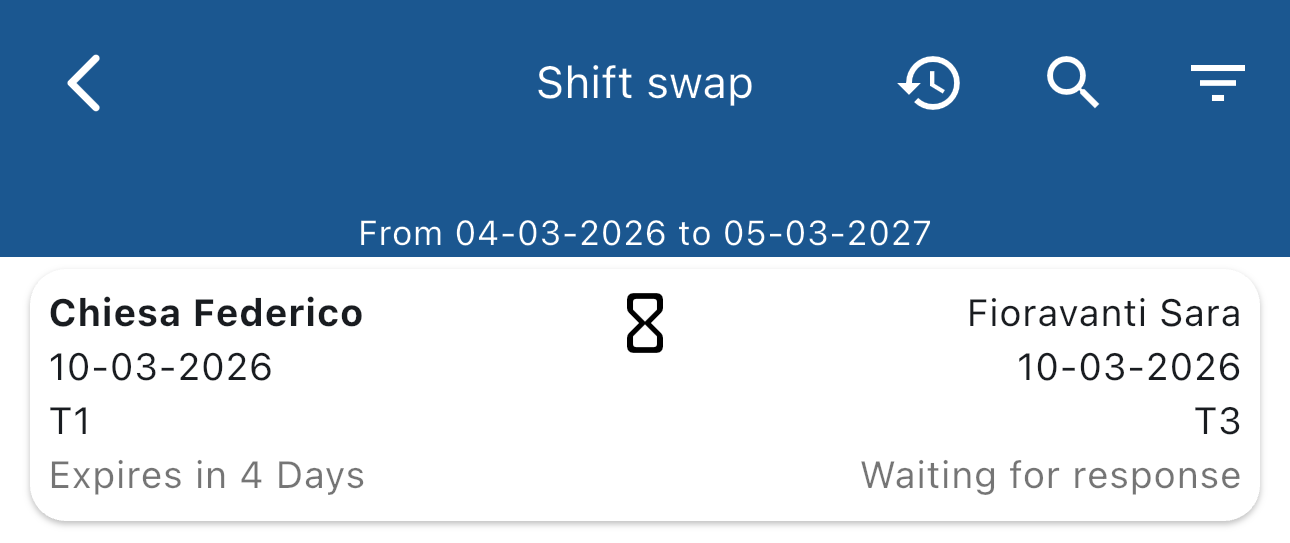
One you've sent the request you can see its state by tapping on the  button:
Justifications
From here, you can see all the justifications you requested in a time period:
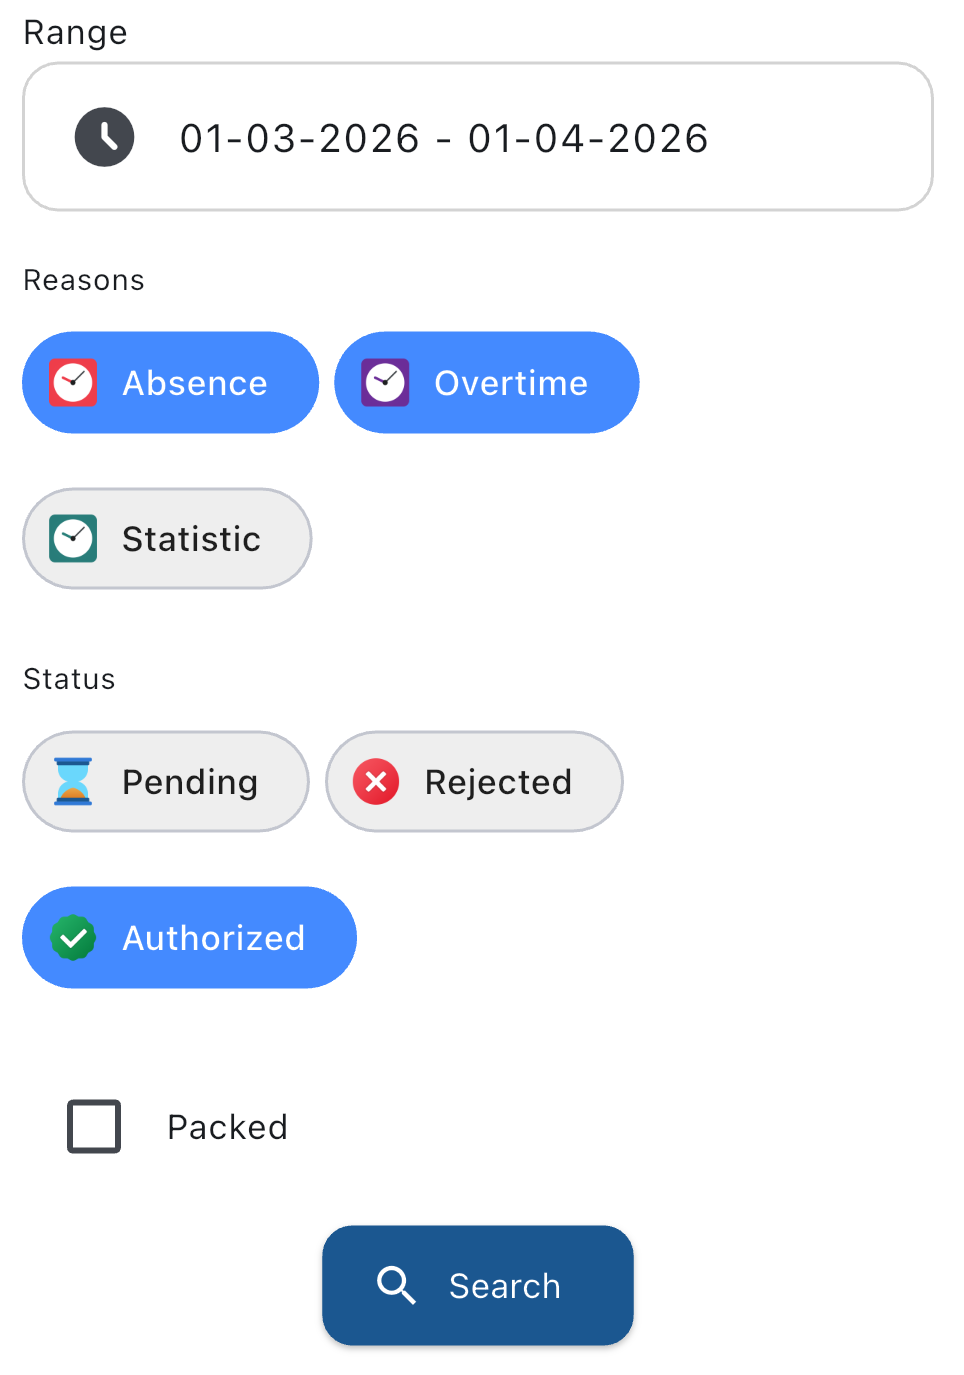
Once you filled all the fields, tap on the  button and you'll see all the justifications.
Dues
This view can vary widely depending on your company.
The dues you could see are how much time off or sick leave you have left, or other information.
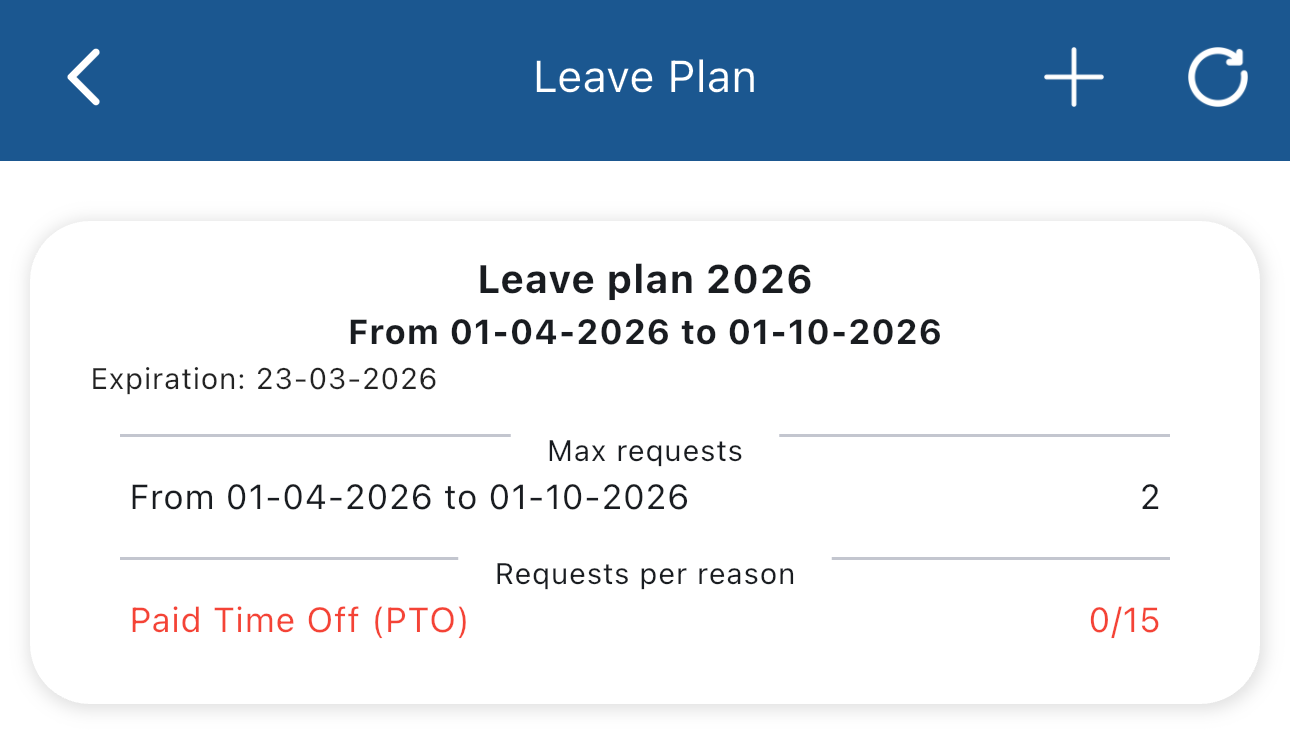
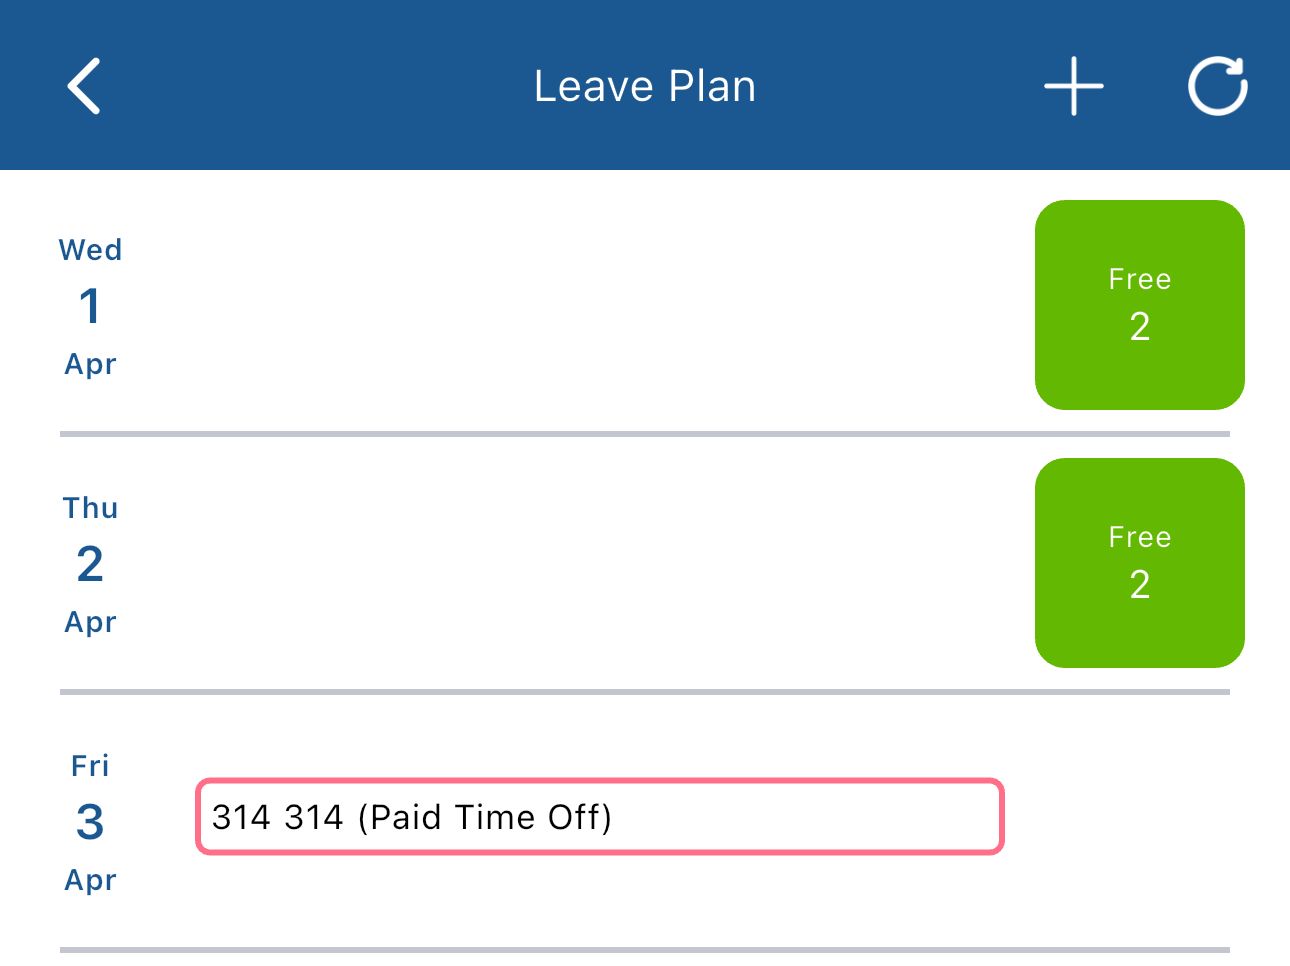
Leave plan
The leave plan is a time range in which you can request leave following rules set by your company.
If there is an active leave plan, tapping Leave plan in the sidebar you'll see this view:
To request leave in the leave plan tap on the  button in the bottom bar and you will see the list of days in which the leave plan is active:
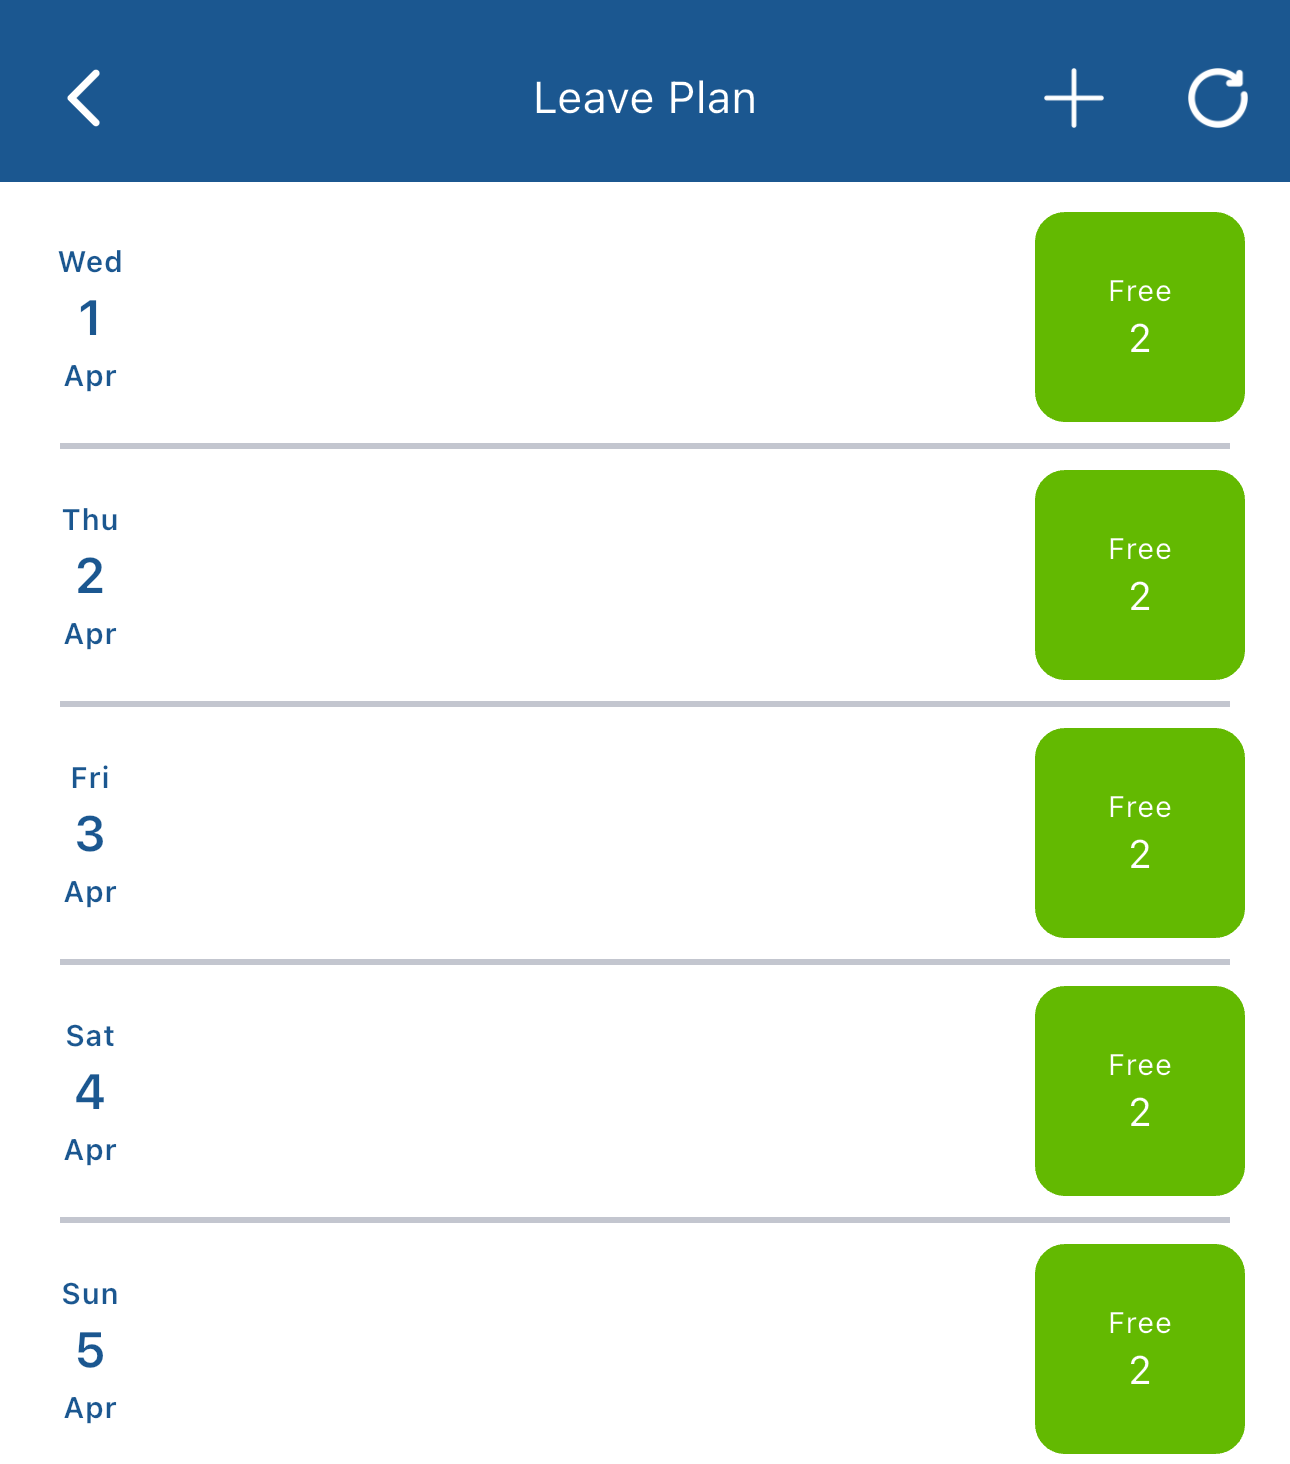
The green number in the green square indicates how many free slots are left for that day.
To request leave on a day tap the green square for that day and fill the form on the window that appears:
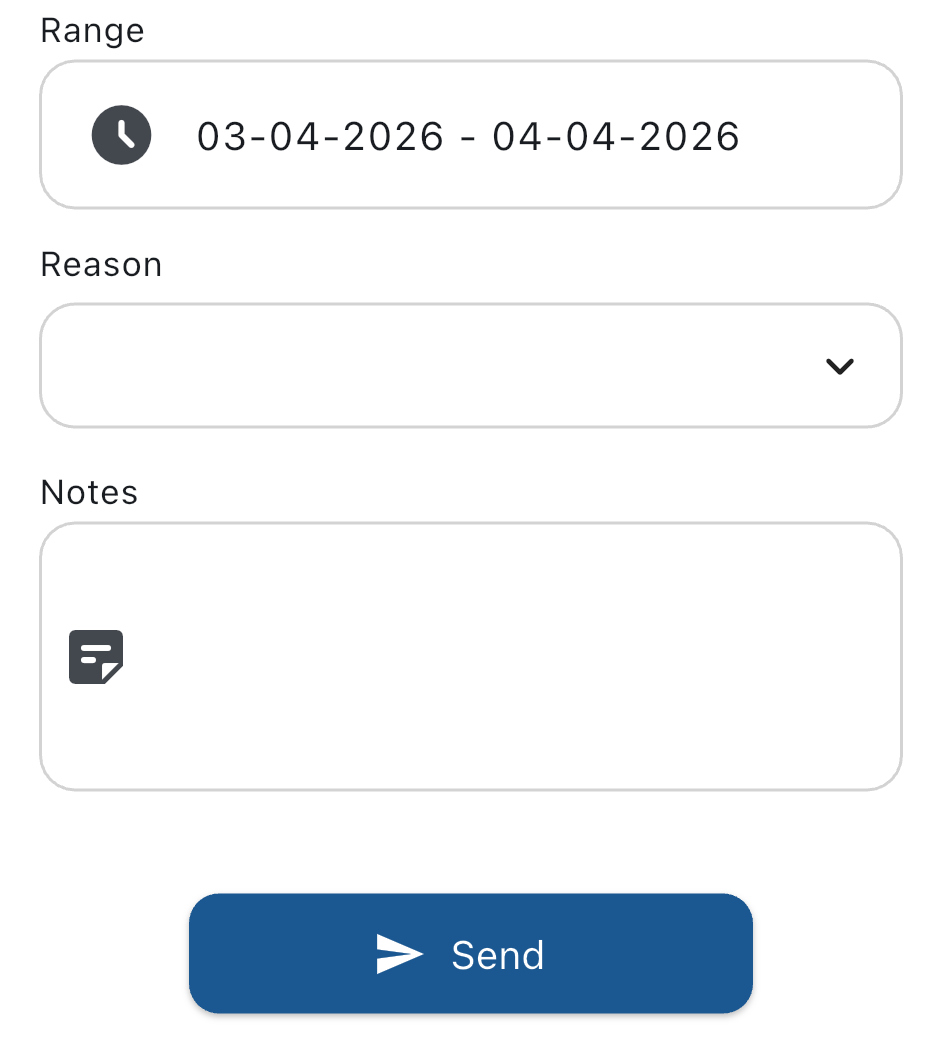
Choose the reason and if needed write a note for your manager and tap the button to send the request. Now you can see it in the list:
Anomalies
Here you can see your anomalies: these are inconsistencies between your shifts and your clockings.
Here are two example of an anomaly and how you can resolve it:
- If you forgot to clock in you can request a clocking in the past, if your company allows it.
- If you clocked in late you can add an absence to cover the time between the start of the shift and your clocking.
Documents
In this section you can download documents like your payslip or other company documents.
By tapping on a document you'll be able to choose for which month and year you want to download the document and then by tapping on the 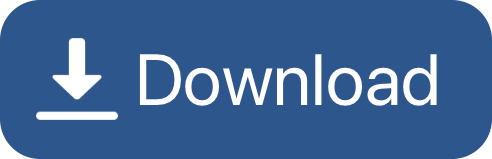 button you can download the document.
Settings
In this section you can choose which notifications you want to get, you can reset all the filters you set by tapping on Reset saved filters, change the language and get more info about the app.